Groupware functions (calendar, contacts and tasks)
MailPro supports a number of groupware functions. This applies to calendar, contact and task functions.
Find out here how to use these functions in MailPro Webmail.

Manage and use contacts
The Contacts view offers the following functions:
- New contact → Click on New contact to create a new contact in the currently selected view (under Contacts in the left-hand column) or group. You now have the option of entering data for the new contact as desired. To save a new contact, you must enter at least a first and last name or define an email address. Under the entry New/edit detail view, you can find out what other options you have in this view.
- New group → Click on the + symbol in the left-hand column under Group to create a new group for contacts. To create a new group, you must give it a name.
- Edit contact → Click on the Edit contact button, to change the contact marked in the middle. Under the entry New/edit detail view, you can find out what other options you have in this view.
- Remove contact → Click on the Trash button to permanently delete the contact marked in the middle.
- Email to contact → Click on the pencil icon to send a new email to the contact marked in the middle. The Write view will automatically be opened with the email address of the marked contact as a recipient.
- Import → Click on the up arrow icon to import a contact from a vCard (.vcf) or .csv file from your computer.
- Export → Click on the down arrow icon to export the contact marked in the middle as a vCard (.vcf) or .csv file from your computer.
- Help → Clicking on the Help icon will open the help page for the Contacts view
- Further settings → Here you can find the following functions:
- Select all → This will select all currently visible contacts in the middle.
- Deselect → All currently visible contacts in the middle will be deselected.
- Export all → All currently visible contacts in the middle will be exported as a vCard (.vcf) or .csv file to your computer.
- Contacts (Views) → Under Contacts you will find the three following views:
- Private → Displays the contacts you have created manually
- Remembered → Displays automatically created contacts who are already recipients in your MailPro Webmail
- Favourites → Contacts that you have marked as favourites with the star symbol.
- Group → Here, you will find two groups as standard:
- Global → Here, you will see all contacts that have already been created in any MailPro email account in your domain
- Shared → Here, you can see any contacts you have shared. To find out how to create new groups, see the New group entry above. You can add a contact to a group by dragging and dropping it into the group.
- Search → Enter a search term to search in Contacts.
- Detail view View contact → Here you will see a contact with data filled out. You cannot change details for contacts in this mode.

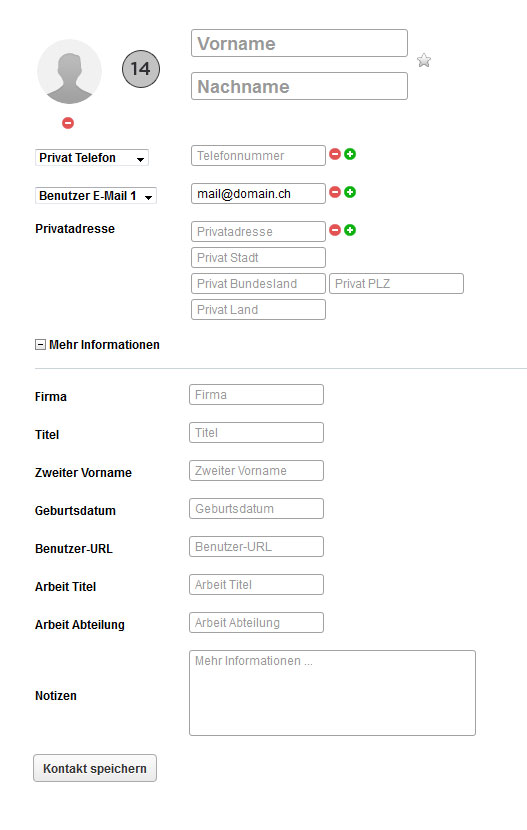
14 Detail viewNew/edit → In the New contact and Edit contact views, you have the following options:
- Change photo → Clicking on the round photo for the contact opens the file explorer of your device. You now have the option of assigning and uploading an image file as a profile photo for the contact.
- Change first name/last name → Here, you can change the first and last names of the contact
- Save contact as favourite → By clicking on the star icon, the contact will be shown in the Favourites view.
- Change/add personal details → In the personal detail section, you can add and edit basic information for the contact. With the green + symbol, you can add similar additional fields, and remove them with the - symbol.
- More information → By enlarging the More information section, you will see further fields (e.g. Company, Title, Date of birth or Notes), which you can fill out for this contact.
- Save contact → After making changes to the contact, be sure to click on the Save contact button, to ensure all changes are saved.
Manage and use calendar
The Calendar view offers the following functions:
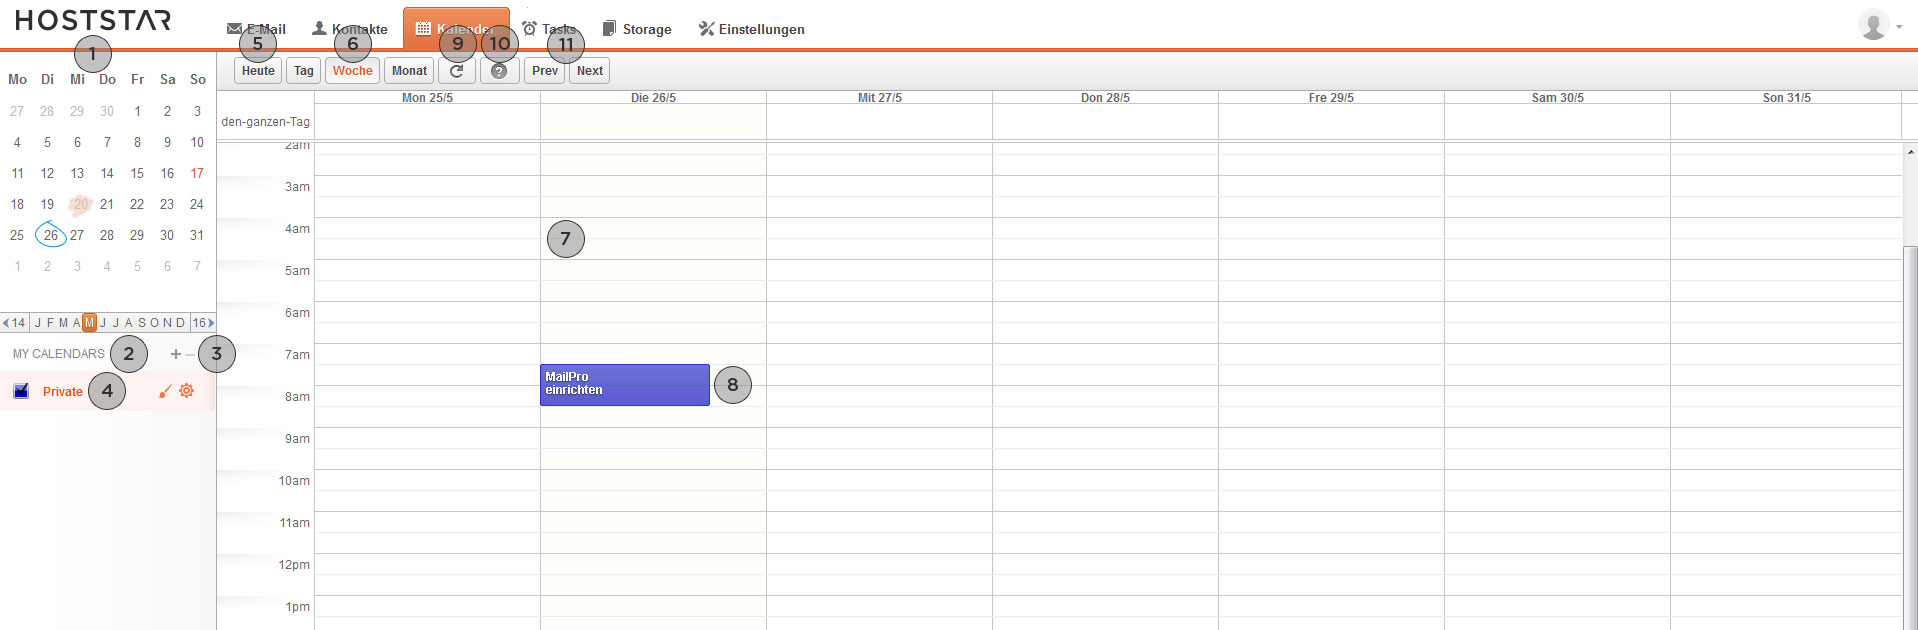
- Mini calendar → In the mini calendar you have the option of selecting a day to display. Depending on the current calendar view (see below), the appointment overview at right will display the day/week/month relative to the day you have selected to display in the mini calendar. You also have the option of changing the month and year using the small tab at the bottom.
- My calendar → Your MailPro calendar will be displayed here. The standard Private calendar cannot be deleted. Click on a calendar to manage the appointments within it.
- Add/remove calendar → With the +/- symbols, you have the option of adding new calendars (+) or removing existing ones (-). Please note that by removing a calendar you will be permanently deleting any appointments in that calendar.
- Calendar options → Under My calendars, the symbols next to the calendar offer you the following functions:
- Hide/display appointments → Activate or deactivate the display of appointments of this calendar in the appointment overview, right.
- Change calendar colour → Change the colour of this calendar and its appointments in the appointment overview, right.
- Calendar settings → Here you can administer the calendar URLs (seeIntegrating via CalDAV) and the option of sharing other MailPro accounts of your domain read and write permissions (first field) or read permission alone (second field) for the calendar in question.
- Today → Jumps to the present day in the Mini calendar (see above).
- Calendar view → With these three buttons, you have the option of changing the display of the appointment overview according to three criteria:
- Day → The appointment overview on the right shows only the appointments for the day chosen in the Mini calendar (see above).
- Week → The appointment overview on the right shows only the appointments for the week in which the day chosen in the Mini calendar falls (see above).
- Month → The appointment overview on the right shows only the appointments for the month in which the day chosen in the Mini calendar falls (see above).
- Add appointment → In the appointment overview on the right, select the desired time frame to create the new appointment. You can define the following values for an appointment:
- Appointment name → The name of the appointment
- Time frame and time zone → Determine the start and end point of the new appointment here. You can also define the time zone. You can set the standard time zone in MailPro Settings.
- All day → Tick this box if the appointment in the defined time period is an all-day event. The fields for setting the time will then be deactivated.
- Action → This refers to the place/time for the appointment to be carried out
- Attendees → Here, you can invite other MailPro users from your domain by entering their email addresses. You have an additional option of sending an invitation by email.
- Note → Here, you can enter additional notes for this appointment.
- Repeat → With this option, you can define a repetition interval (daily/weekly/monthly/annually) for the appointment. Depending on your selection, additional fields will appear for you to further define the interval and set the end of the repeats.
- Category → Here, you can choose the category of the appointment. The available categories cannot be expanded or changed.
- Availability → Select your availability (busy/free/now/out of office) for this appointment.
- Calendar → Here, you can select the calendar in which you want to save the appointment. Above, you can find information on how to add new calendars.
- Remind me → Define whether you would like to receive a reminder for this appointment. You have the choice of receiving the reminder at a certain interval before the appointment, or on a defined date.
- Edit appointment → Click on an existing appointment to edit it. You will see the same fields described under Add appointment. You will also see the following additional buttons:
- Remove → With this function you can permanently delete the appointment from the relevant calendar.
- Refresh → Updates the current display of the appointment overview. Any updates by other users or from linked programs will now be shown.
- Help → Clicking on the Help icon will open the help page for the Calendar view
- Back/Forward → Depending on the current Calendar view (see above), you can move backward or forward on the day/week/month in the appointment overview on the right.
Manage and use tasks
The Task view offers the following options:
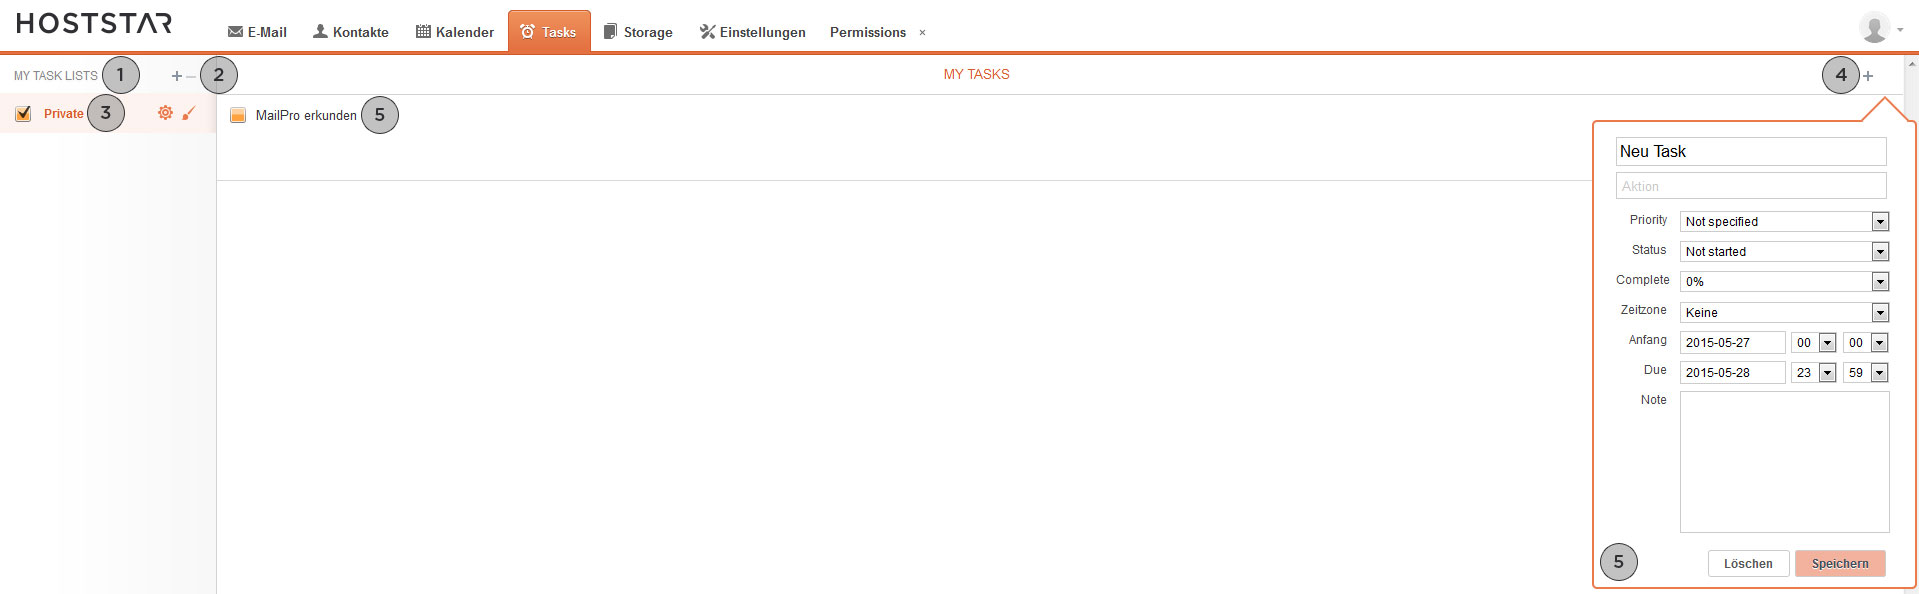
- My task list → Your MailPro task list will be displayed here. The Private task list that comes as standard cannot be deleted and is linked to the MailPro Private calendar. Click on a task list to manage the tasks in it.
- Add/remove task list → With the +/- symbols, you have the option of adding new task lists (+) or removing existing ones (-). Please note that by removing a task list you will be permanently deleting any tasks in that list.
- Task list options → Under My task lists, the symbols next to the task list offer you the following functions:
- Hide/display tasks → Activate or deactivate the display of appointments of tasks in this list in the task overview, right.
- Change task list colour → Change the colour of this task list and its tasks in the task overview, right.
- Task list settings → For external linkage, task lists are regarded as calendars. Here, the calendar URLs (seeIntegrating via CalDAV) are displayed and you have the option of granting other MailPro accounts within your domain read and write permission (first field) or read permission alone (second field) for the task list in question.
- Add task → Click on the + symbol at the top right to add a new task to the currently selected task list.
You can define the following values for a task:- Task name → Enter the name of the task
- Action → This refers to the place/time for the task to be carried out
- Priority → You have the option of setting a priority for the task, graded from 1 (high) to 9 (low).
- Status → You have the option of setting a status for the task. You can choose from the following values: Not started, In progress, Completed, Deferred, Waiting on someone else.
- Complete → You have the option of defining the completion of the task in %.
- Time zone → You have the option of setting a time zone for the task.
- Start/due → You have the option of setting the start and end time for the task.
- Note → Here, you can enter additional notes for this task.
- Edit task → Click on an existing task to edit it. You will see the same fields described under Add task. You will also see the following additional buttons:
- Remove → With this function, you can permanently delete the task from the relevant task list.
Use MailPro Webmail
Data storage