Administration - New Server Generation
The section Hosting contains the subpages: Overview, Settings, Databases, FTP, SSH, Cronjobs,Backup, Statistics, Monitoring, ModSecurity, SSL certificates und Software.
My Panel from Hoststar makes managing your hosting account extremely easy. Under Administration - New Server Generation you will be offered all setting and adjustment options with just a few clicks.
IMPORTANT:
In our hosting area you can set up the new domains or subdomains as WEBSITE. This means that settings such as forwarding, SSL, domain aliases, PHP versions, password protection etc. can be adjusted, stored or added independently of each other for each Website. Here you can find out which Settings you can make for each Website.
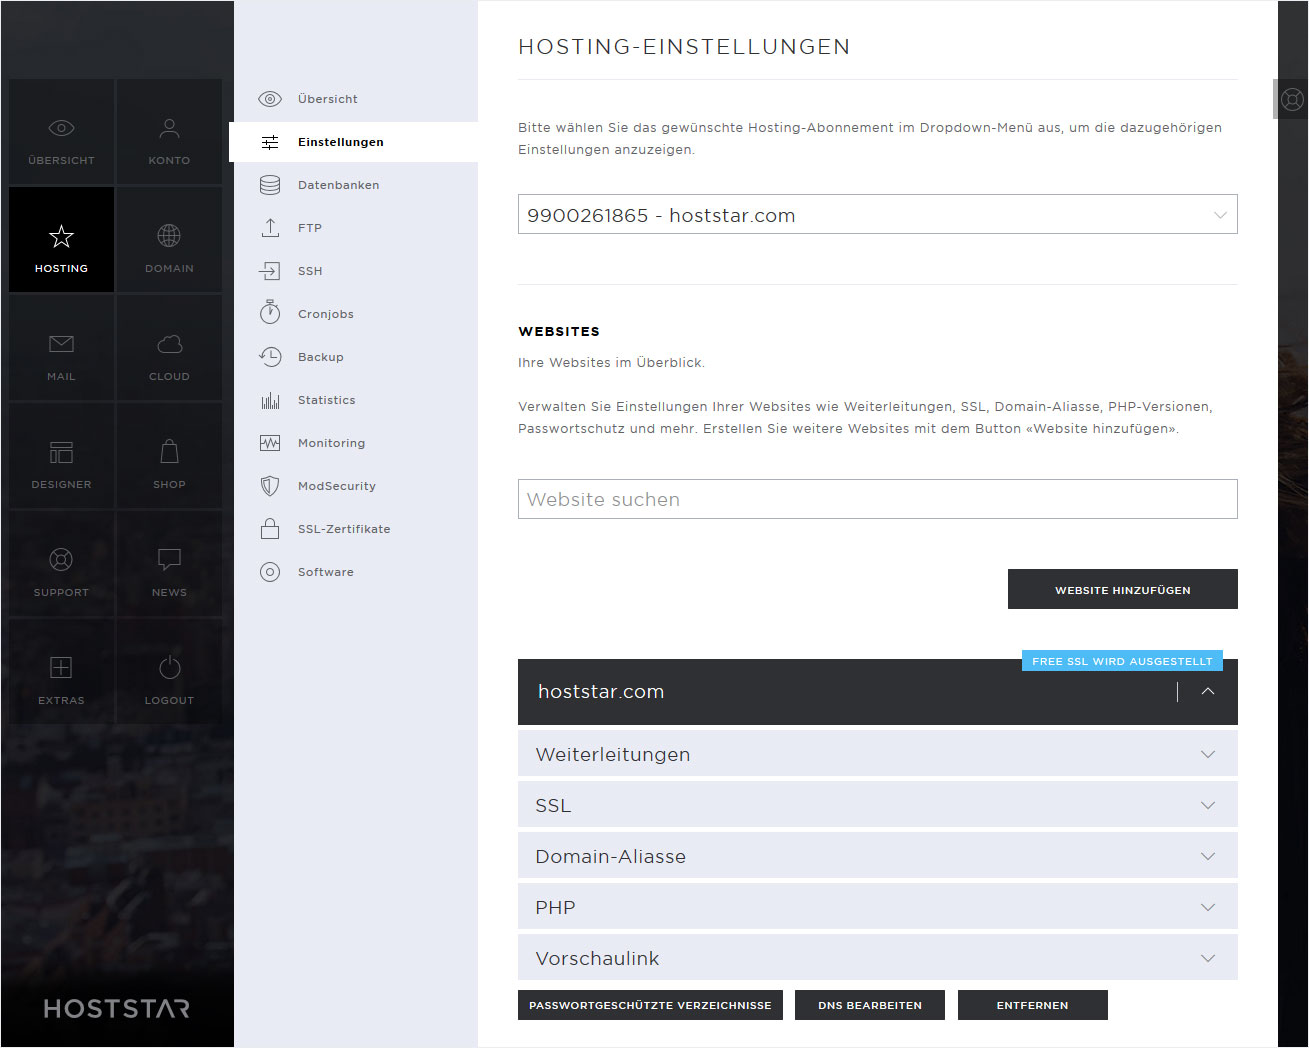
1. Setting overview
After you have selected the menu item Settings in the menu on the left, you will automatically be redirected to the corresponding overview page.
You can now make the following settings here:
• Select hosting (if there are several)
• Add website (for new domain or new subdomain)
Per website:
• Forwardings
• Directory
• External URL
• 301 Redirect
• SSL
• Activate Free SSL
• Enforce HTTPs
• Domain aliases
• PHP
• Preview link
• Password-protected directories
• Edit DNS
• Remove website
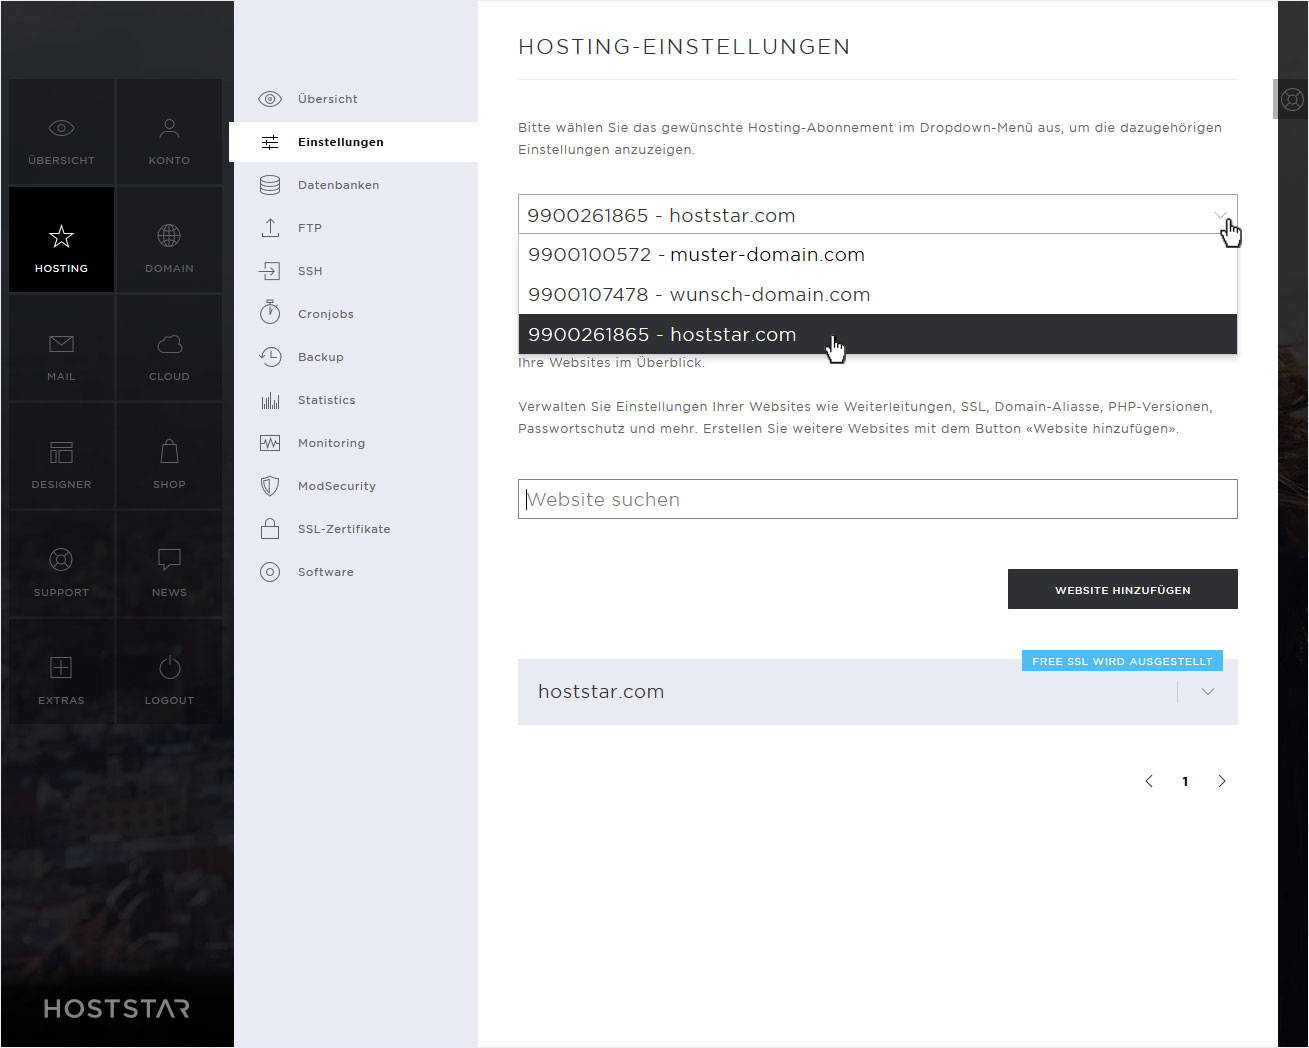
1.1 Select hosting
If you have several Hostings at Hoststar, you can select the desired hosting. Click on the grey arrow icon to open the dropdown view of all Hostings at Hoststar. Now select the desired hosting.
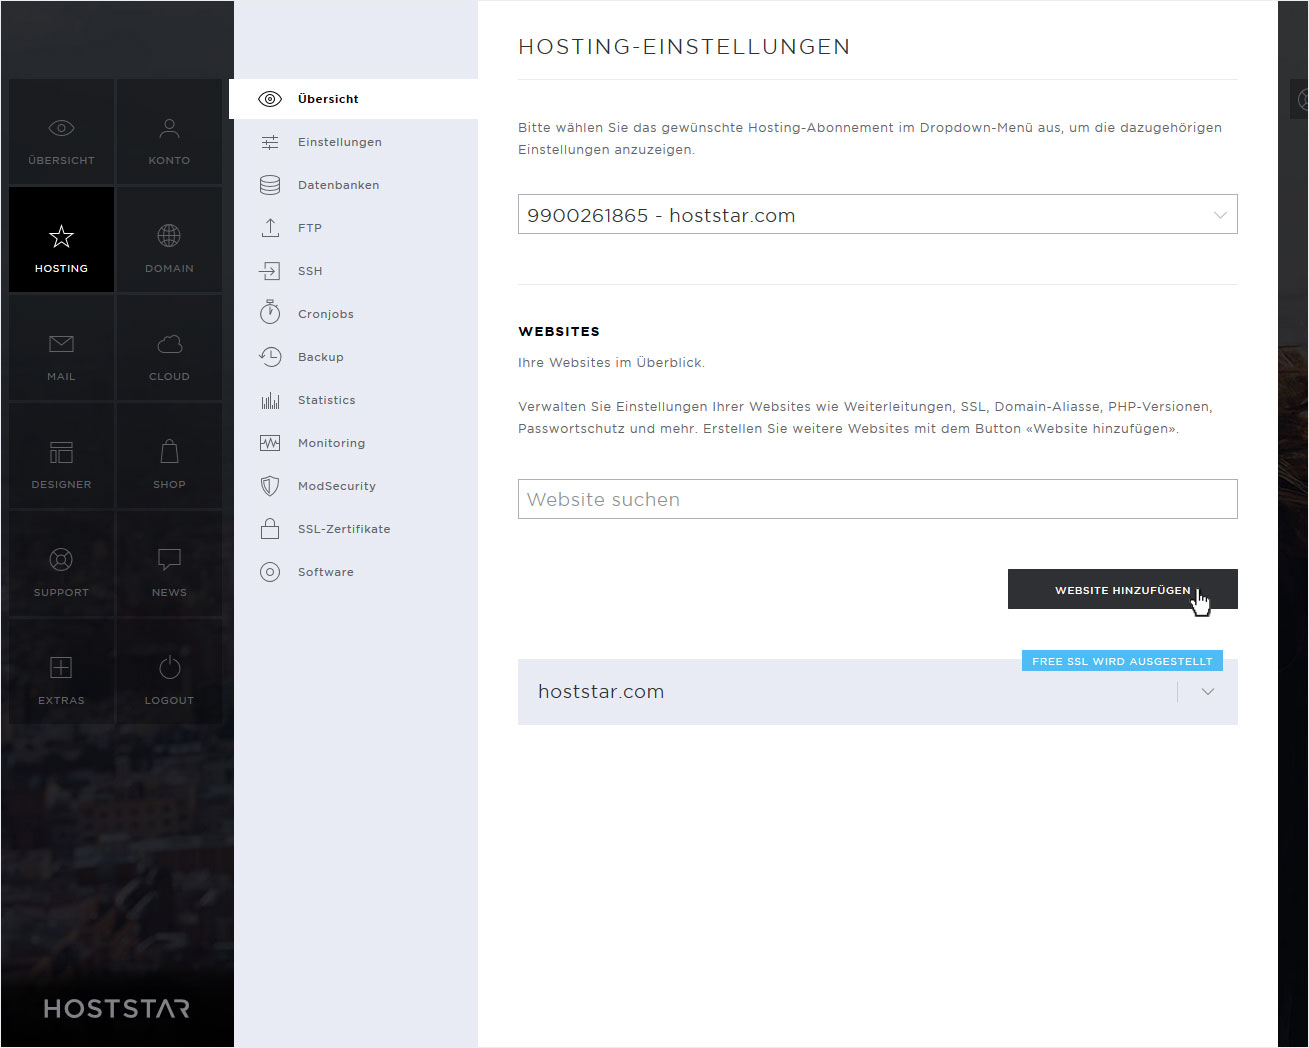
1.2 Add website
For example, to install a Shop in an independent area, it is recommended to add a new website. This way you can set the settings for your shop independently from all other website areas.
Click on the Add website button.
In our example we deposit a subdomain as a Shop website domain. Thus we insert in the popup opening now under subdomain Shop.
Of course, you can also add your own domain as a new website at any time. However, you must have registered this domain in advance and assigned it to the corresponding hosting. (see instructions Add domain)
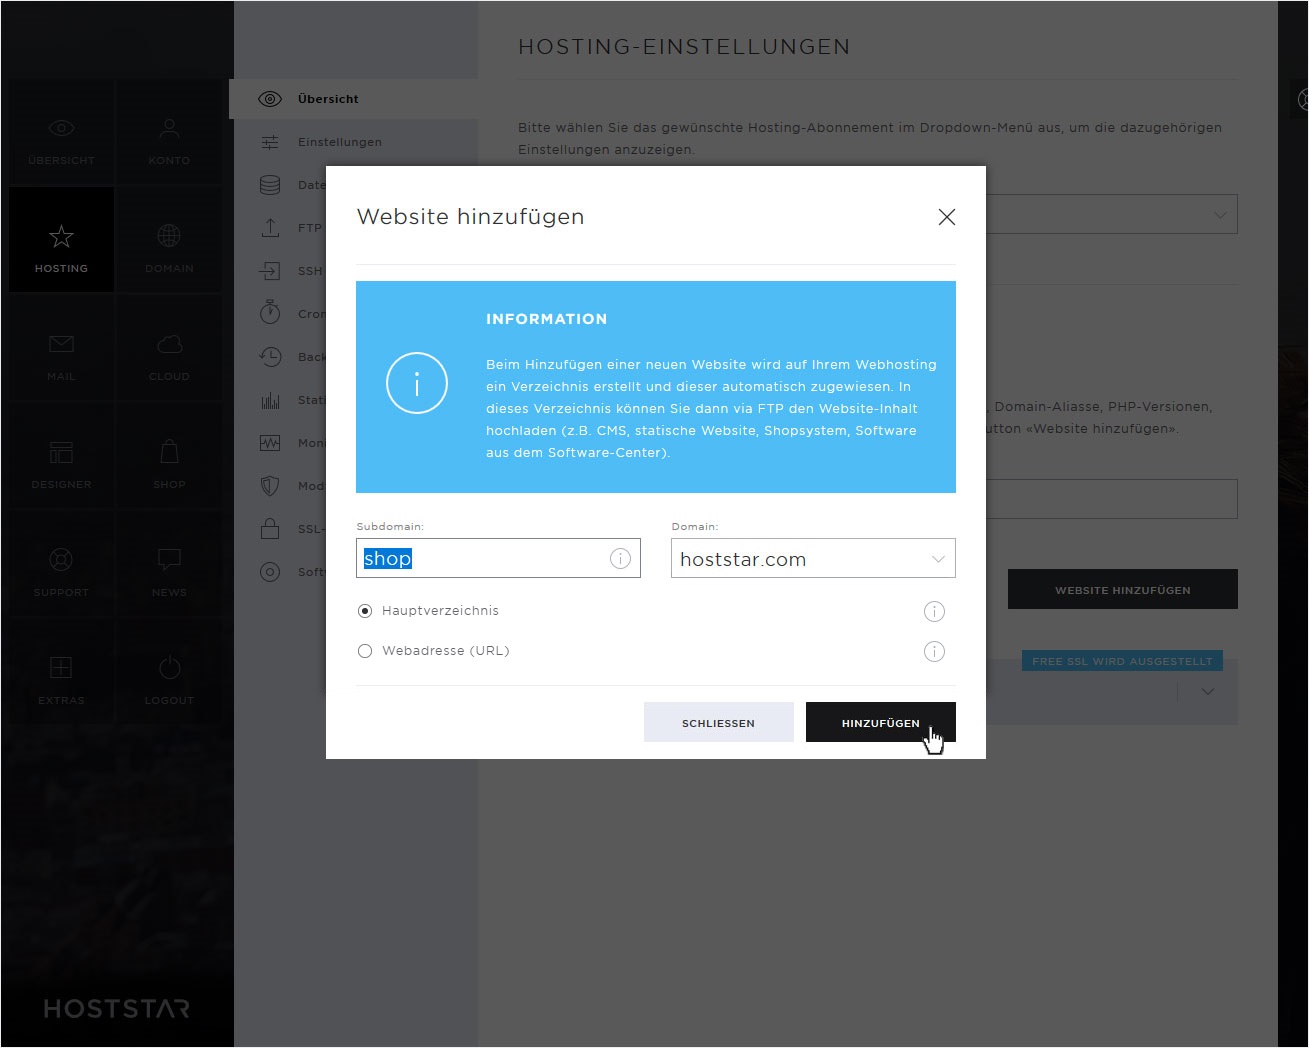
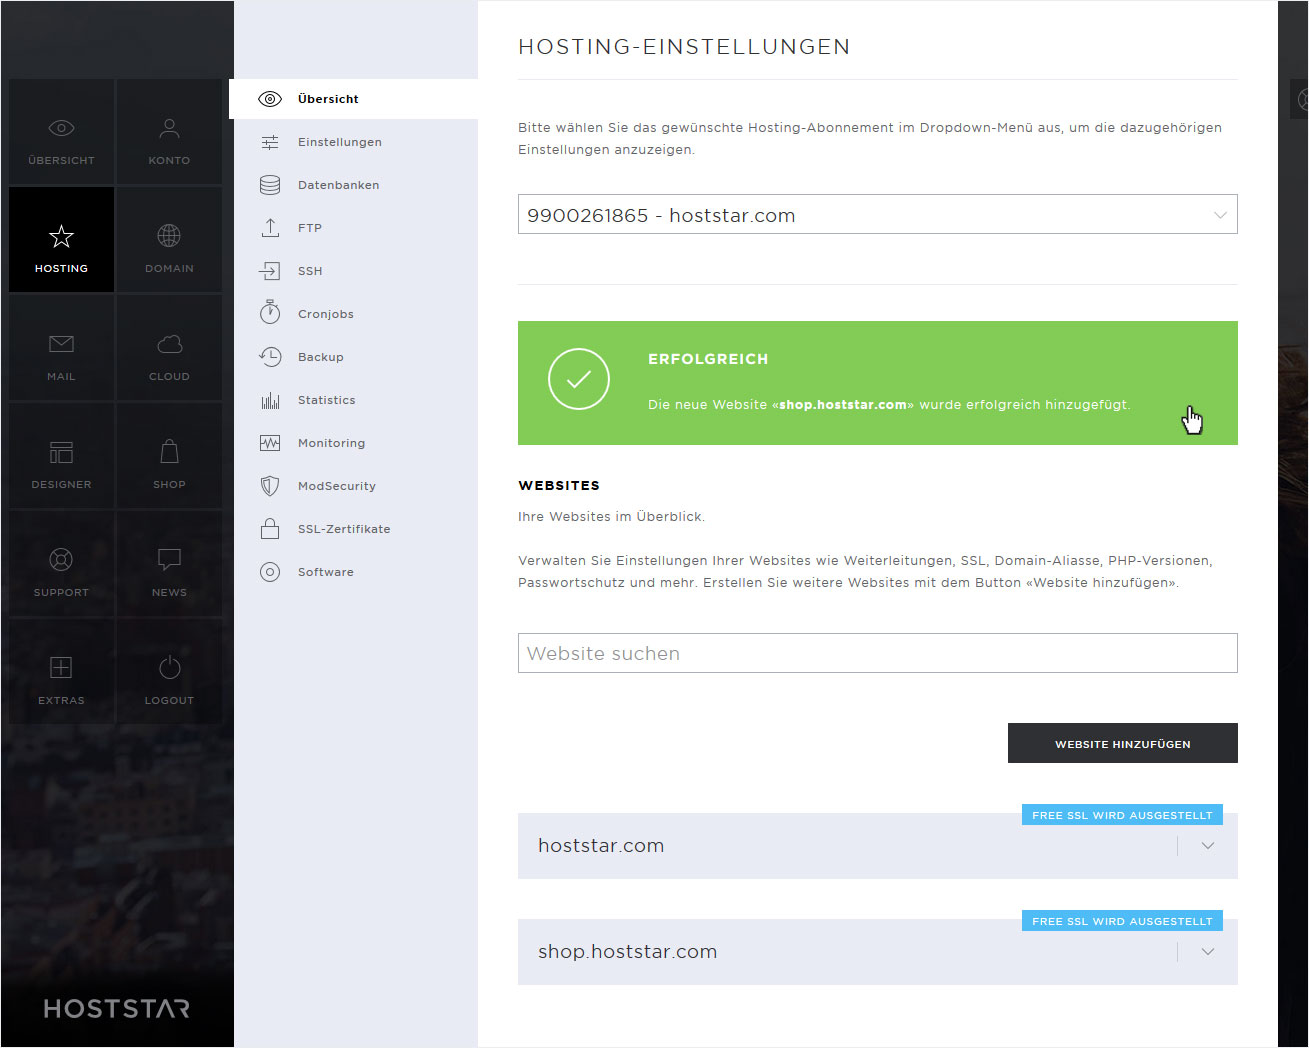
Then click on Add. The new Website section will be created immediately and indicated by a green success message.
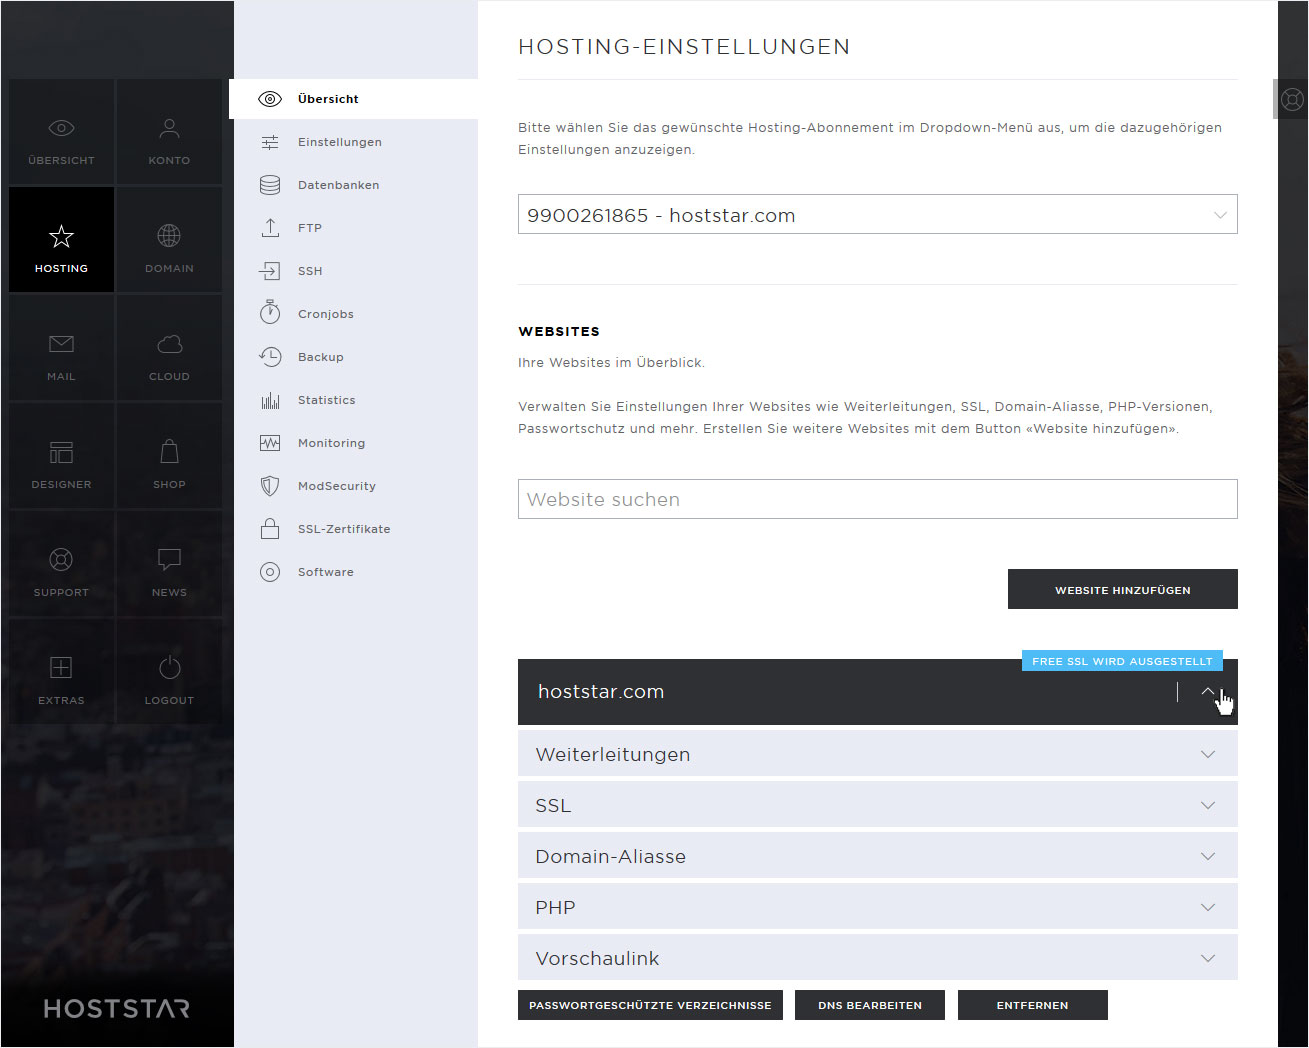
2. Settings per website section
In order to now make the individual settings for each website section, click on the grey arrow icon next to the desired section and make the settings for exactly this section.
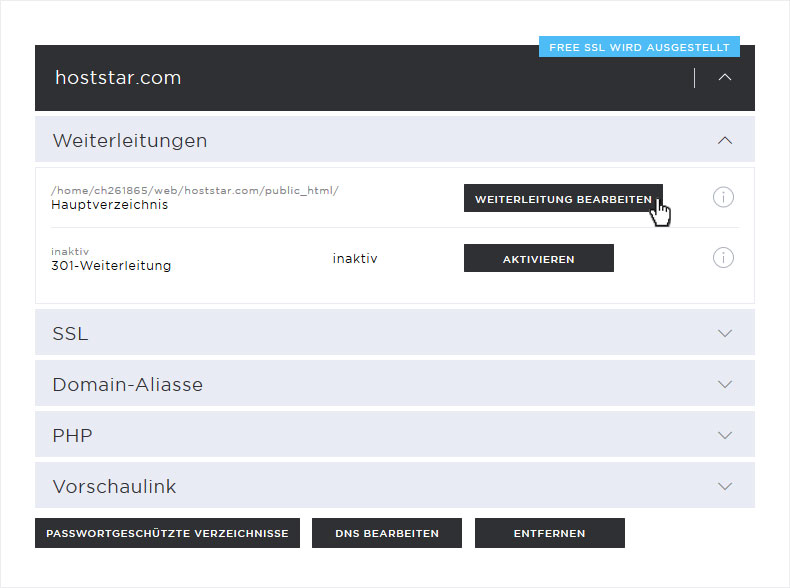
2.1 Forwardings
To add a forwarding, click on the grey arrow icon at Forwarding. The following forwarding options are available:
• Directory
• External URL
• 301 Redirect
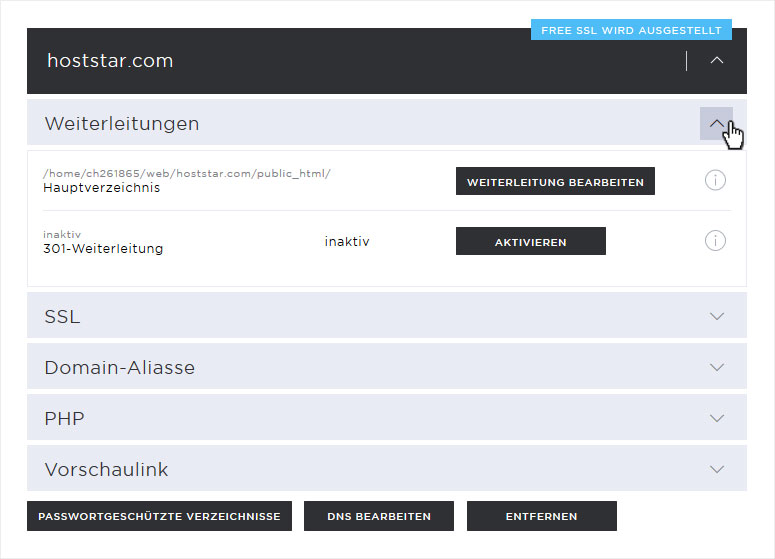
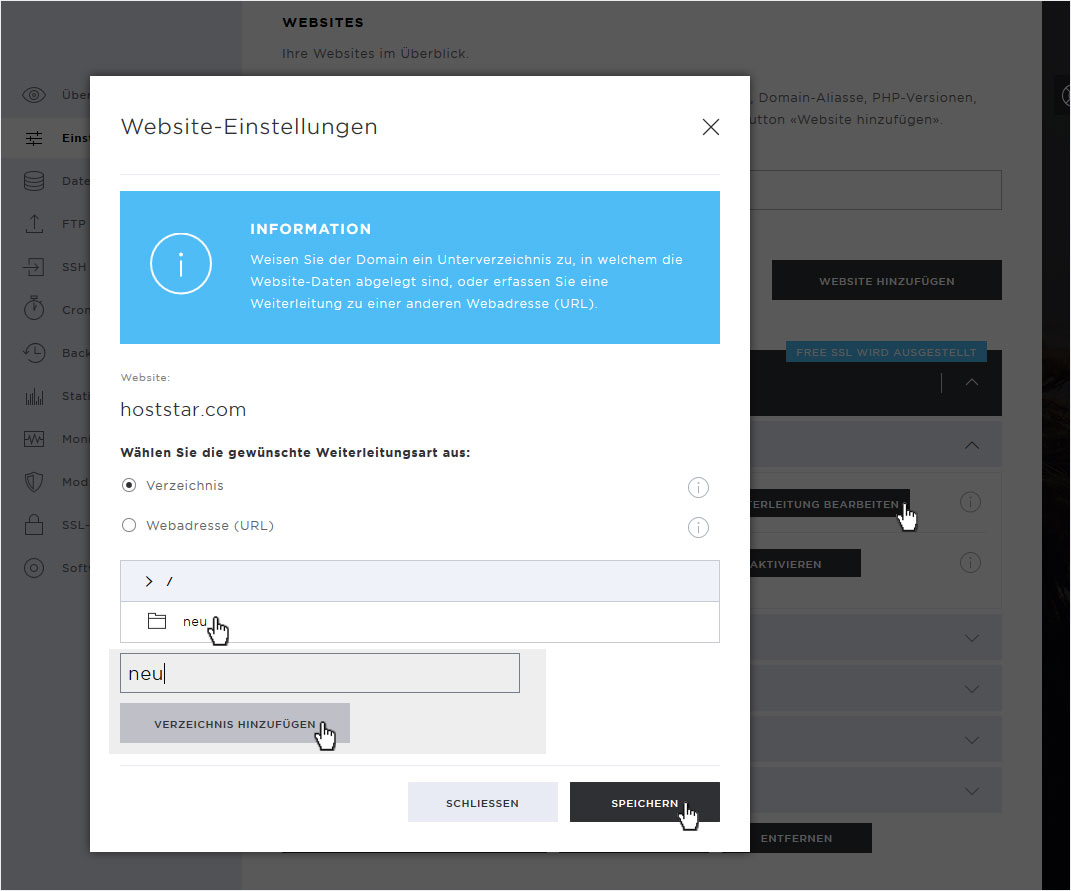
Forwarding to a directory
When a Website section is created, an independent directory structure is automatically created into which the domain is routed. If you would like to forward the domain to another directory, click on the Edit forwarding button.
In the pop-up window that opens now, you can either select an existing directory or add a new one. If you want to add a directory, enter the name and click on Add directory. This will be created immediately. Select this directory and the domain will be redirected to this directory by clicking on the Save button.
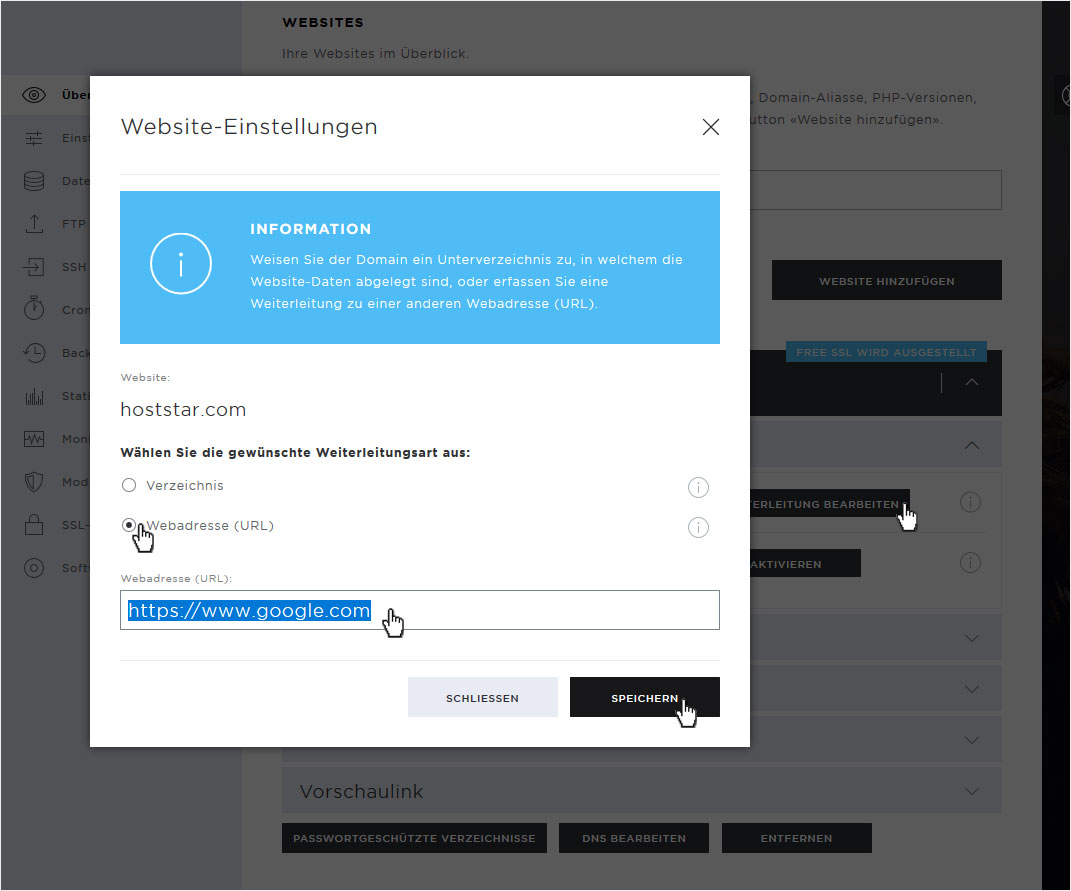
Forwarding to a web address (external URL)
If you want to redirect this domain to an already existing website, click the Edit redirection button.
In the pop-up window that opens now, select Web address (URL) under the forwarding type and activate it. You will immediately see a text field below, where you can now enter the corresponding URL to the existing website. Then click on the Save button to save the settings.
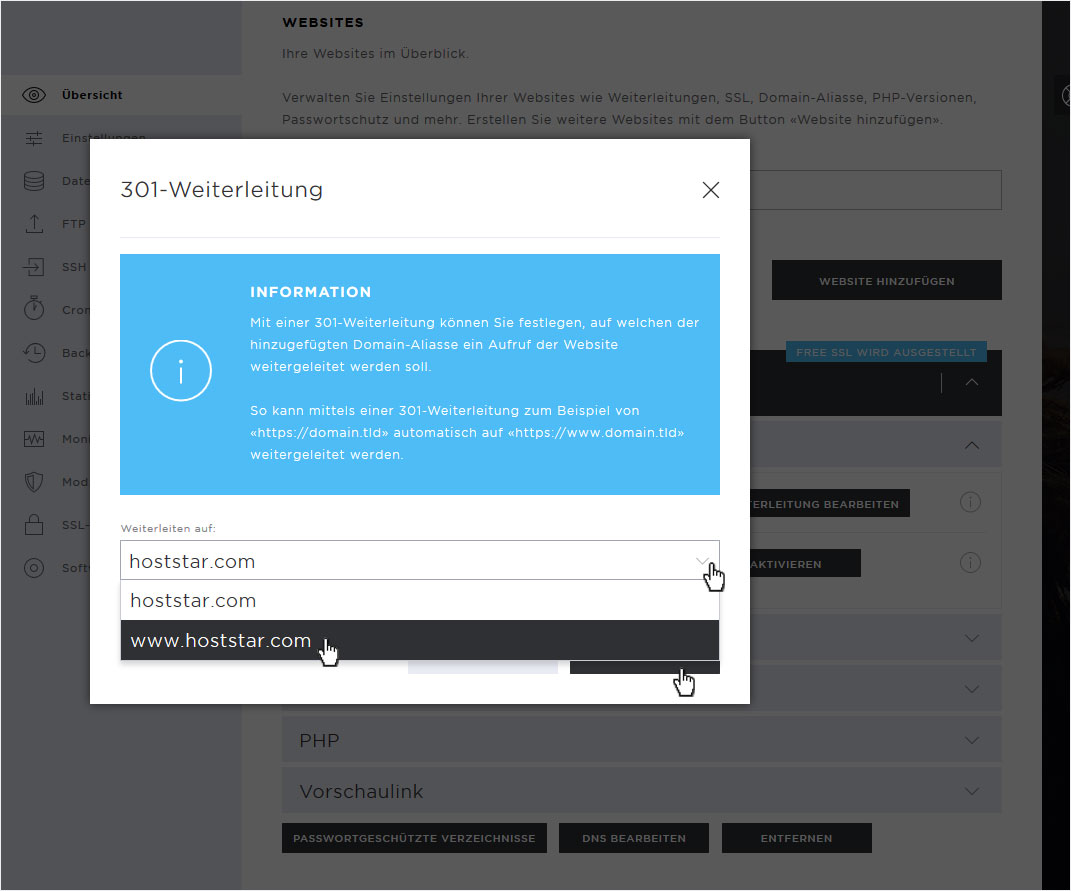
Forwarding 301 Redirect
301 forwardings or 301 redirects are used to avoid duplicate content. If the designed website is to be accessible with and without www, this would normally mean, that we'd have to create the page twice. Once for the domain with www and once for the domain without www.
To prevent this, you can simply activate 301 forwarding under Forwarding and forward the domain with www to the existing content. To do this, click on the Activate button.

Select the appropriate variant in the Forward to: area. So without www to with www (then select the domain name with www) or vice versa. Then click on the Save button to save the settings respectively activate the forwarding.
2.2 SSL
To adjust the SSL settings, To adjust the SSL settings arrow icon at SSL. The following forwarding options are available:
• Activate Free SSL
• Enforce HTTPs
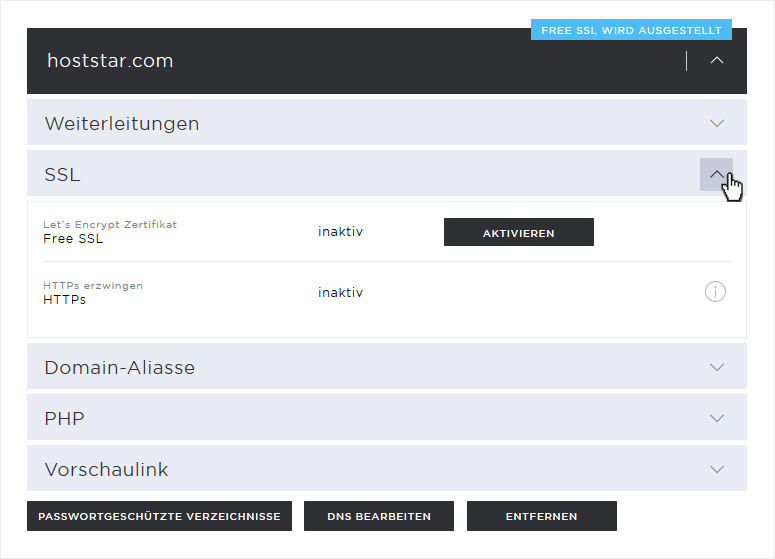
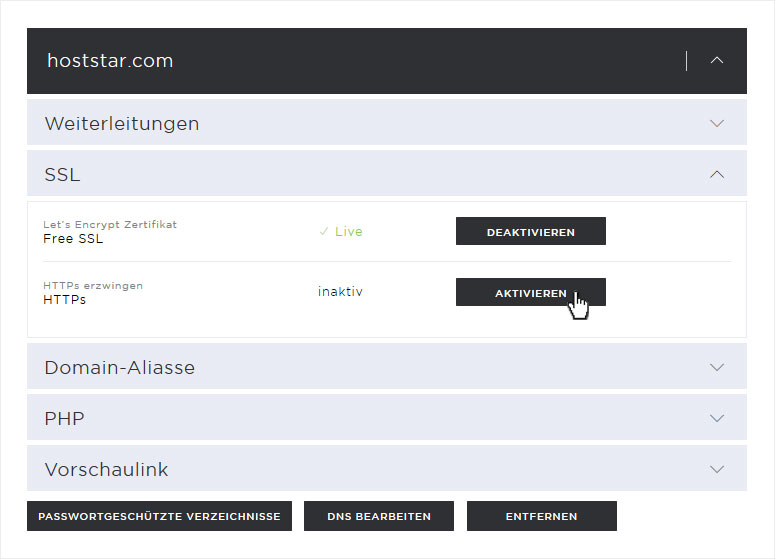
Activate Free SSL
By default, all domains and subdomains are equipped with a gratuitous FreeSSL certificate from Let's Encrypt. At the beginning it may take some time until the blue note Free SSL will be issued disappears and the Free SSL is active. Once this has been done, you can also deactivate it here.

Enforce HTTPs
As soon as your Free SSL is active, or if you have activated your own SSL, you can force a redirection to https by activating this function.
Click on the Activate button. After a short time, the activation of these settings is confirmed by a green success message.
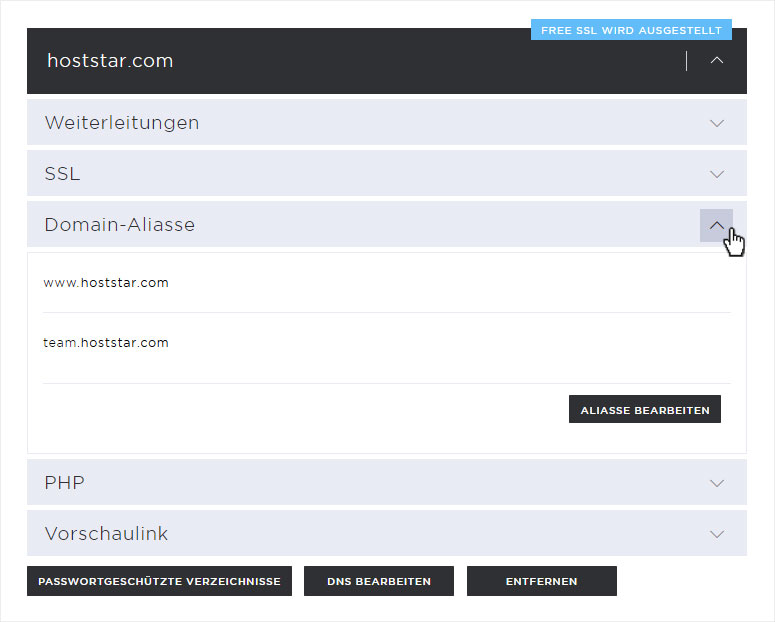
2.3 Domain aliases
If you want to add more domain names or subdomains that point to the content of this website, you can add them here under Domain Aliases. Click on the Edit Aliases button.
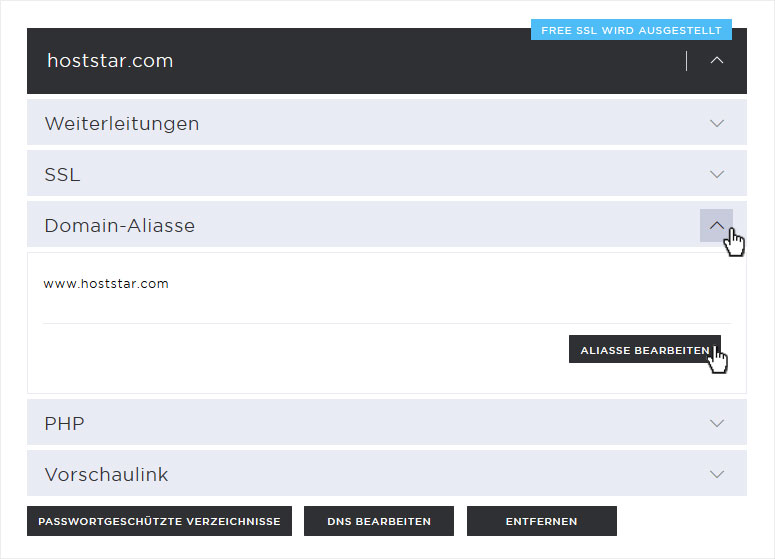
In the pop-up window that opens, you can now enter or select the desired subdomains or domains (which must be added beforehand). Then click on the Add button. It will immediately be added to the Domain Aliases section. Once you have entered all of them, save your settings by clicking on the Close button.
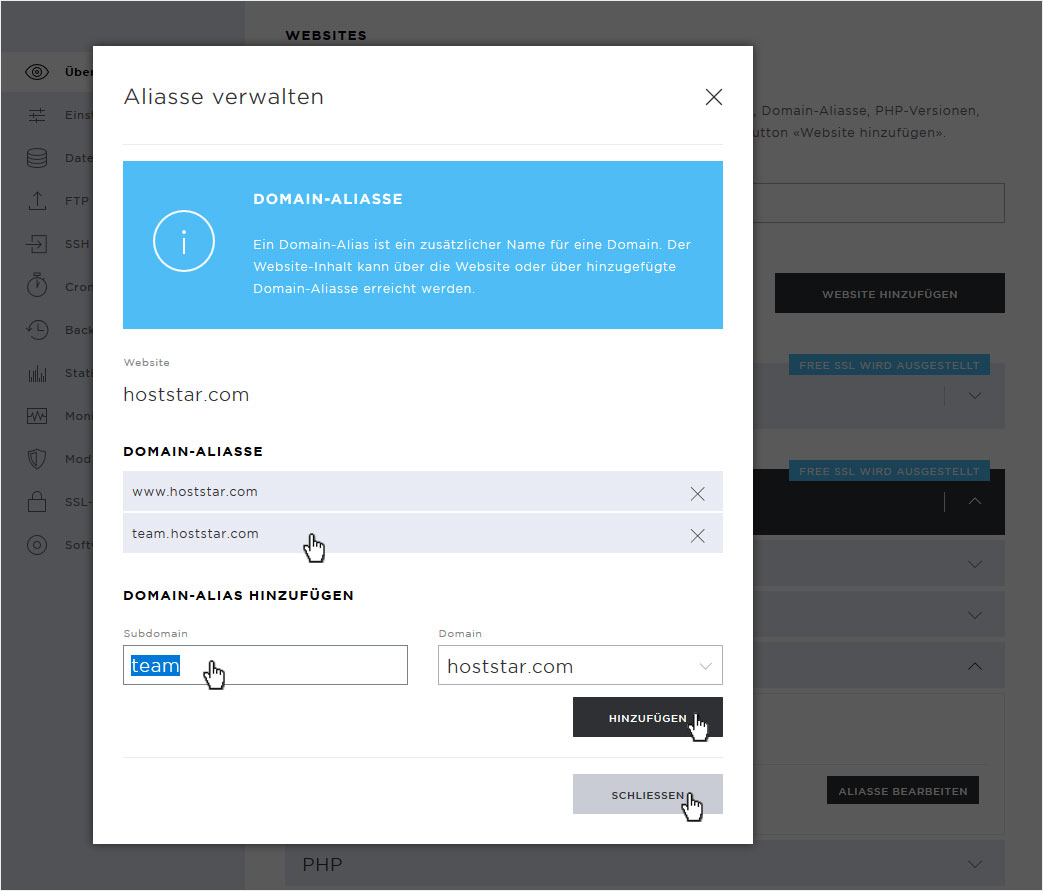
If you now open the Aliases section again, the newly added aliases will be displayed. You can edit, change and delete them at any time.
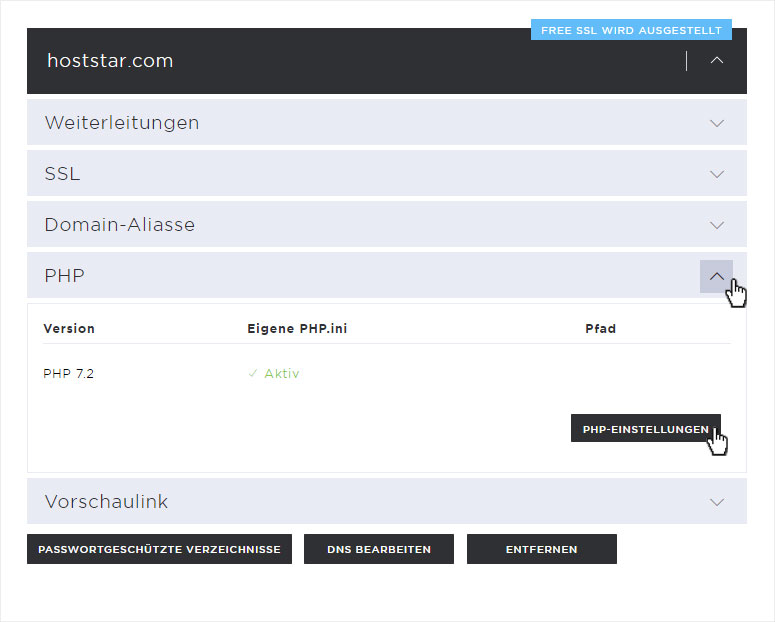
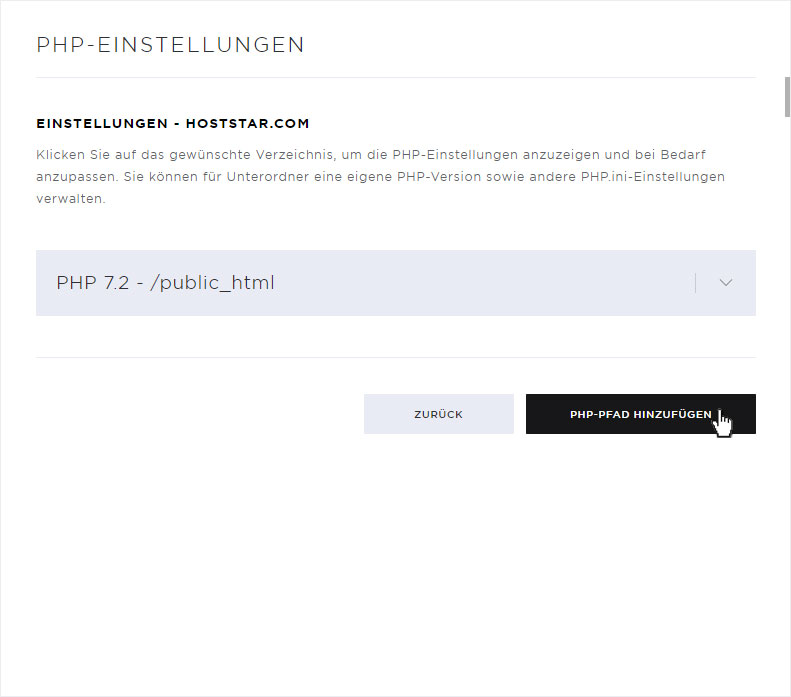
2.4 PHP settings
In the PHP settings section, you can make the following settings for each Web pages section:
• Change PHP version
• Set up PHP.ini
• Add PHP path
• Remove PHP path
Click on the PHP settings button to do this.
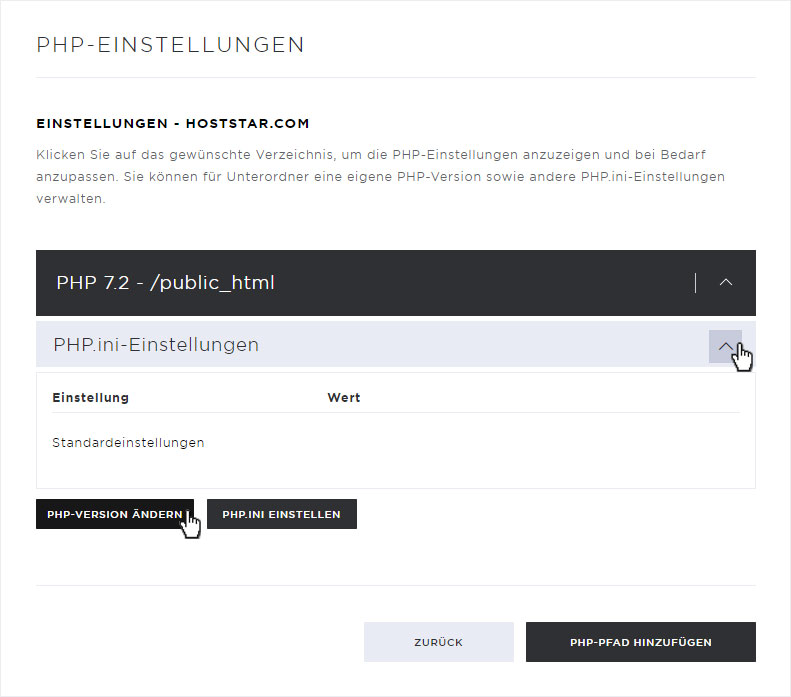
Change PHP version
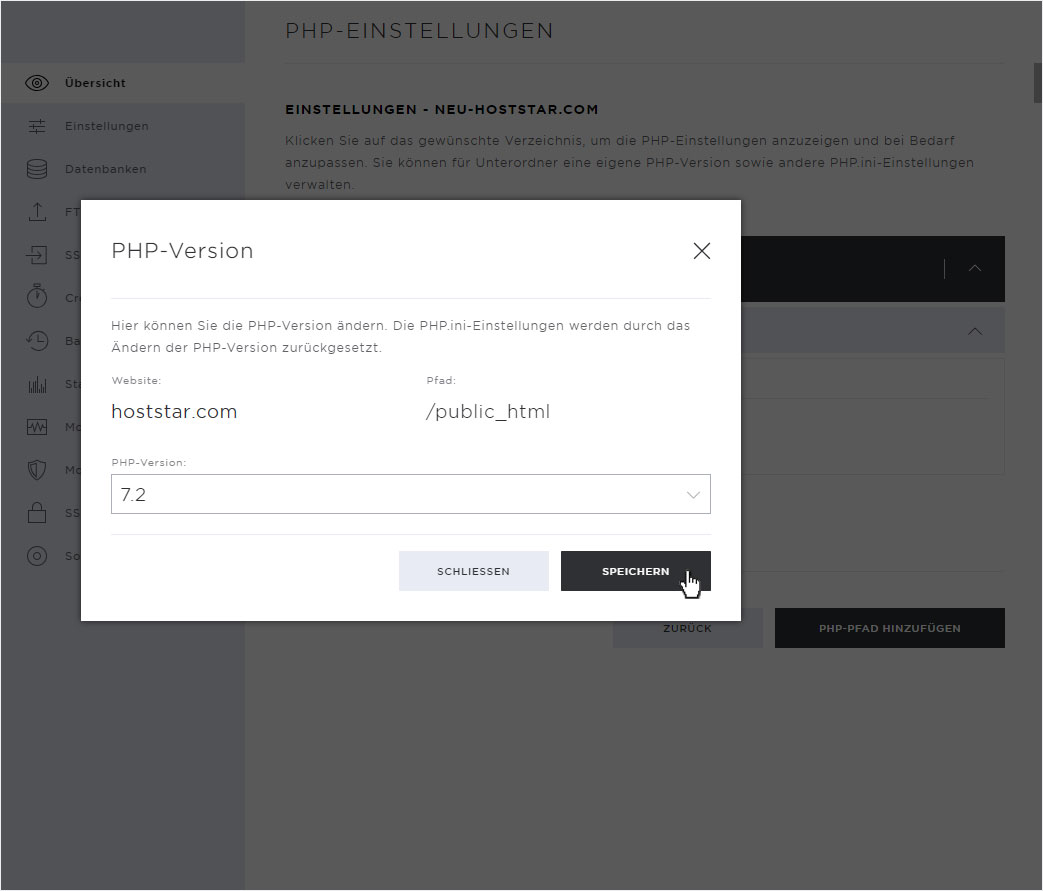
To change the PHP version for this area (domain or website), click on the Change PHP version button.
In the pop-up window that opens, click on the Drop-down arrow under PHP version. Select the desired or required PHP version.
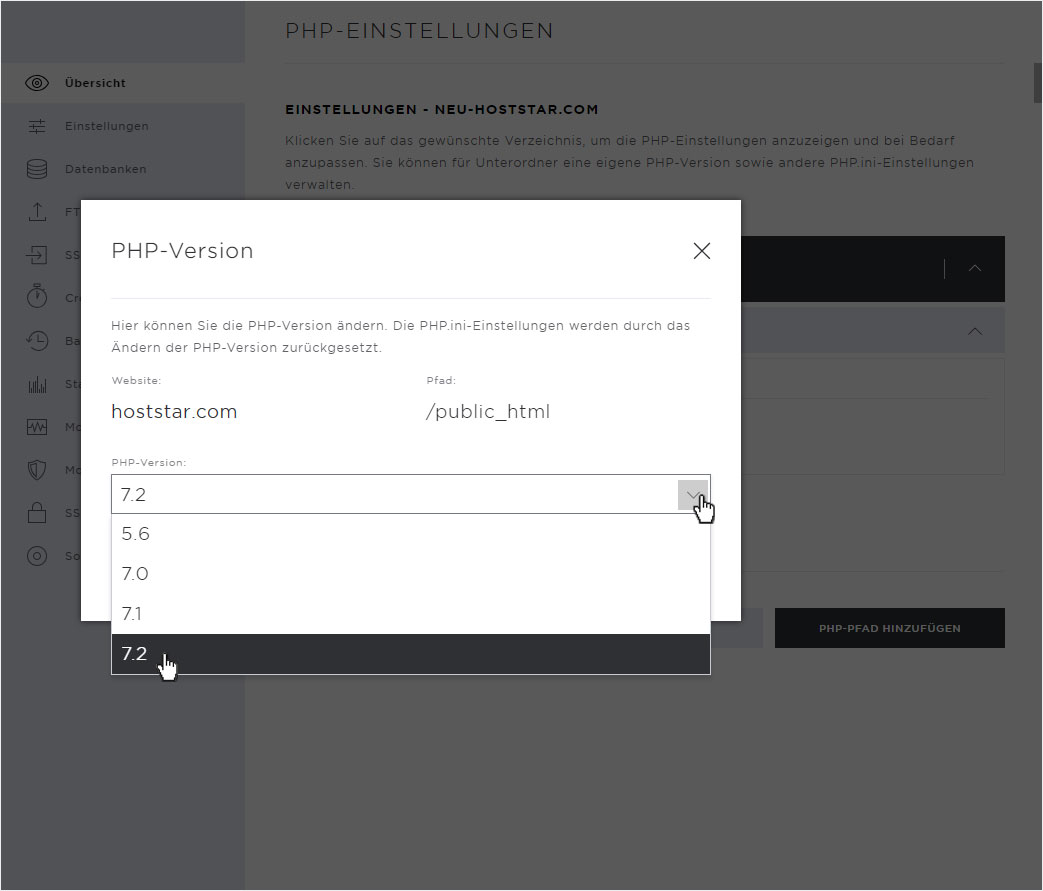
Then click on Save, to save your settings.
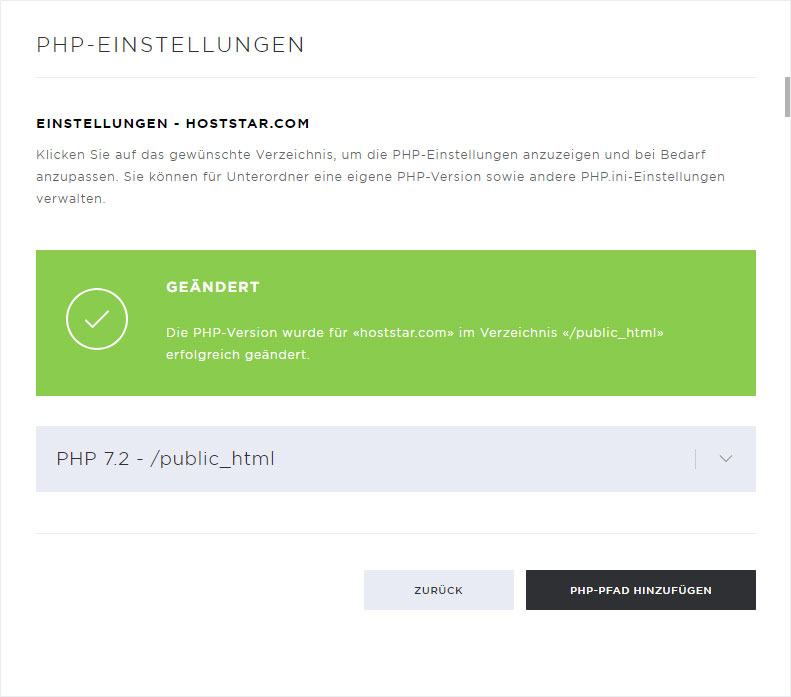
A green Success message indicates that the version adjustment has been successfully saved.
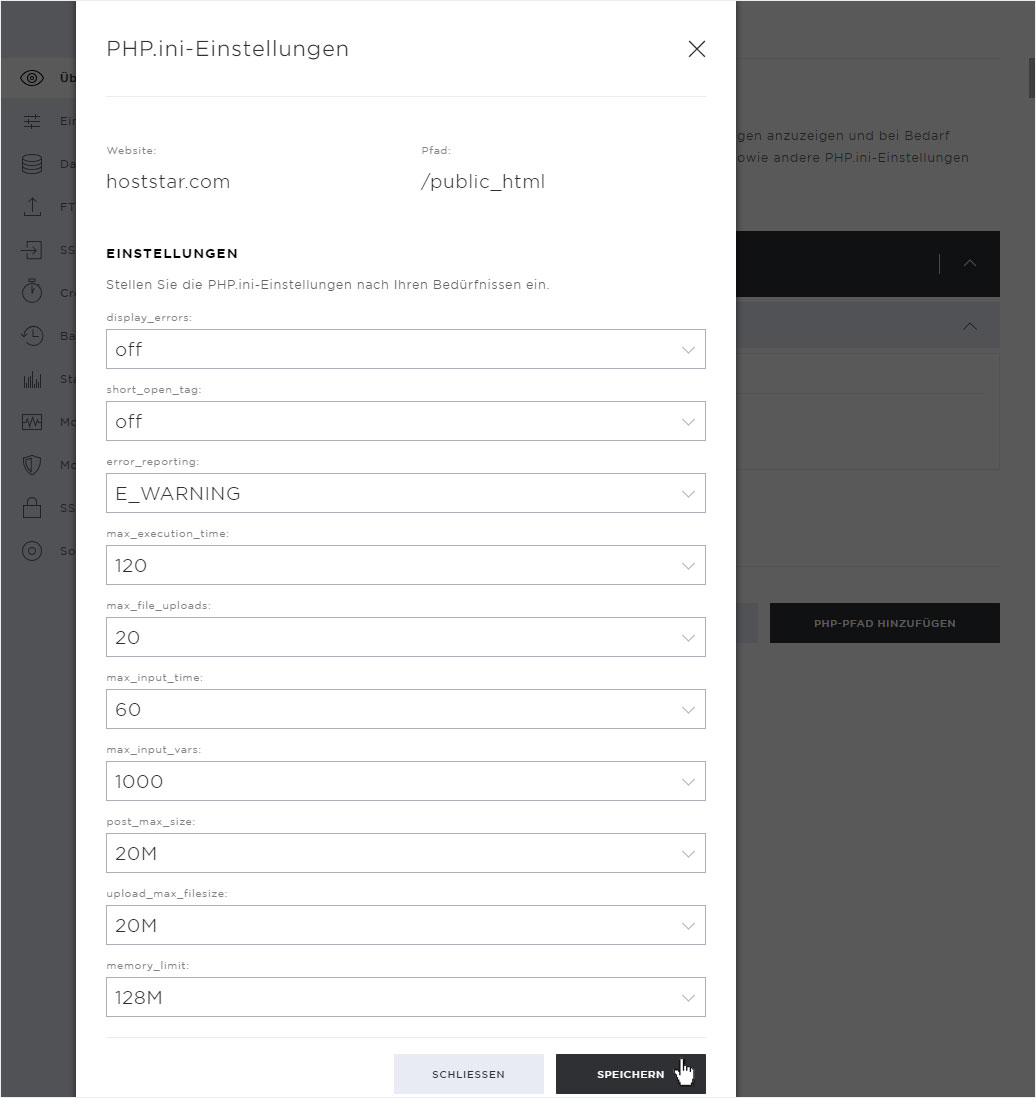
Set up PHP.ini
The PHP.ini file is a configuration file for the PHP applicattion and is read when a page is started. If you have the necessary knowledge, you can configure or adapt this PHP.ini file according to your needs.
Click on the Set up PHP.ini button.

In the pop-up window that now opens, you can make the desired settings. If all adjustments are according to your wishes, click on the Save button.
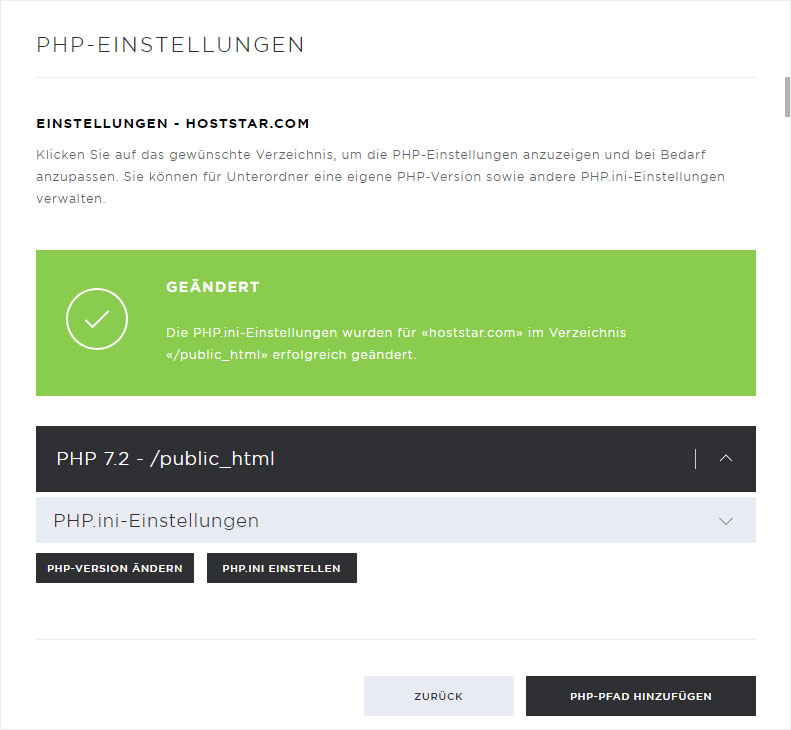
A green Success message indicates that the version adjustment has been successfully saved. The PHP.ini settings section has also been updated.
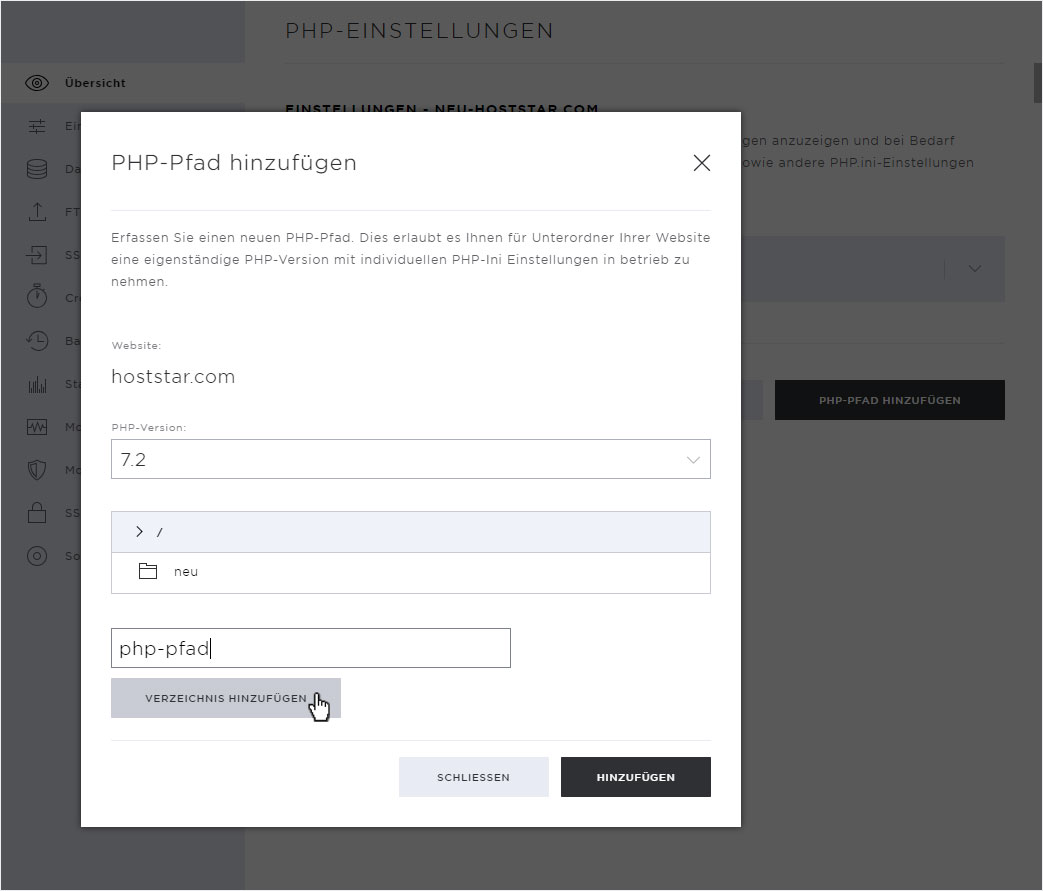
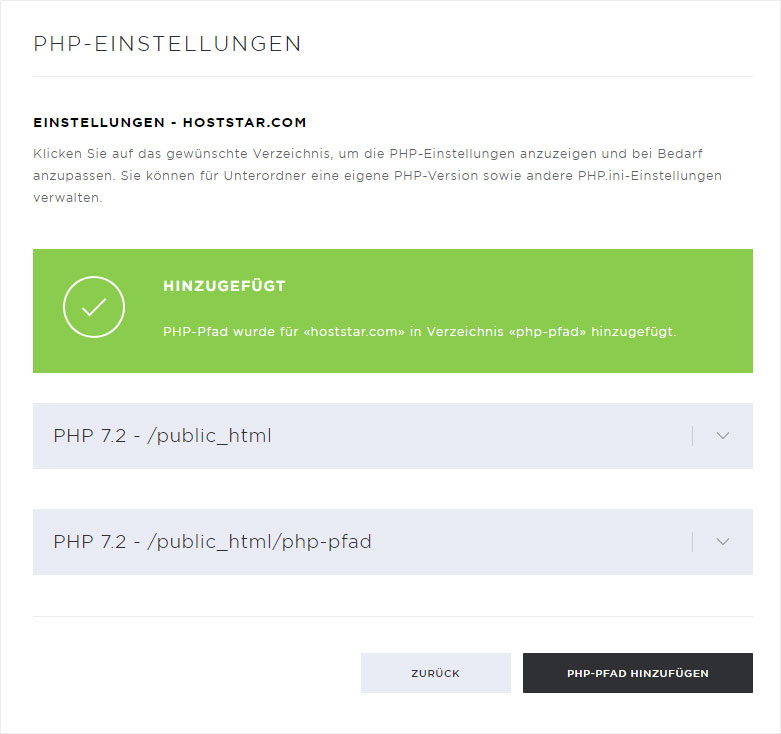
Add PHP path
You have the option to define a new PHP path. This allows you, for subfolders of your website, to run a separate PHP version with individual PHP-ini settings.
Click on the Add PHP path button.
To add a new directory, enter the appropriate name and click on the Add directory button.
The new directory will be created immediately. By clicking on it, it will be selected automatically.
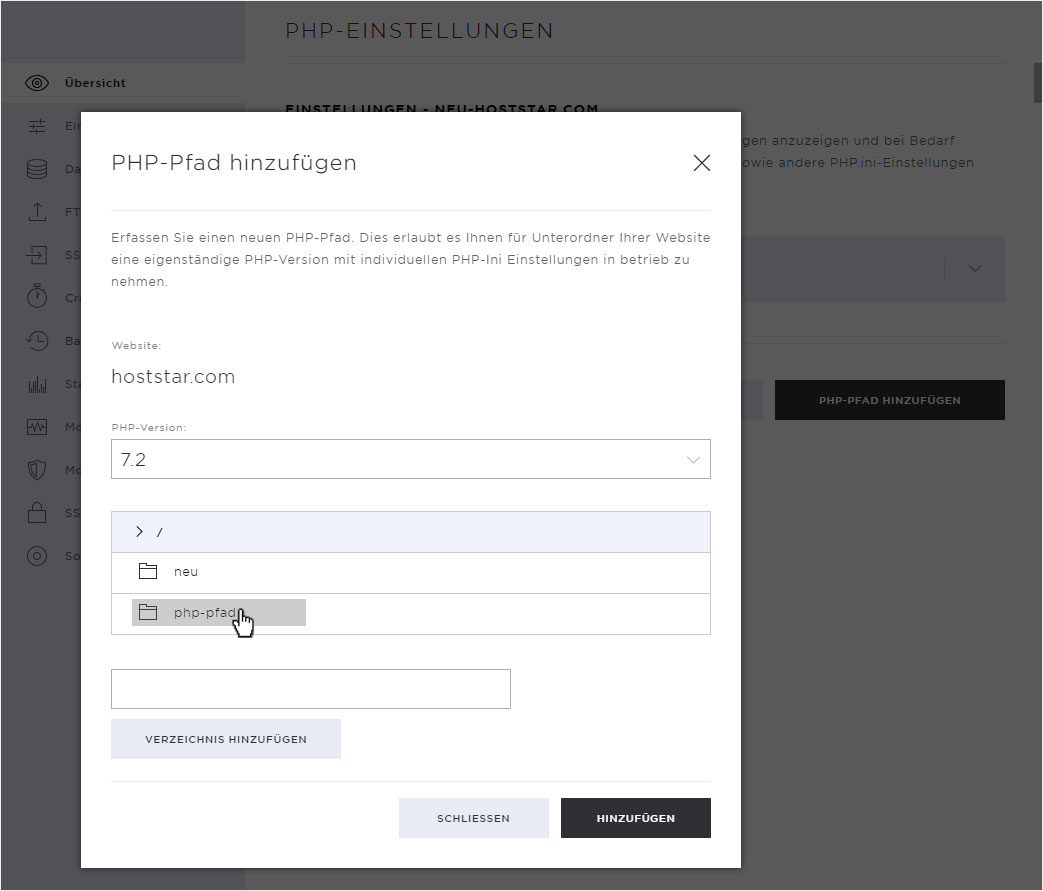
You can now select the PHP version you want for this directory by clicking on the Drop-down arrow. Save these adjustments by clicking on Add.
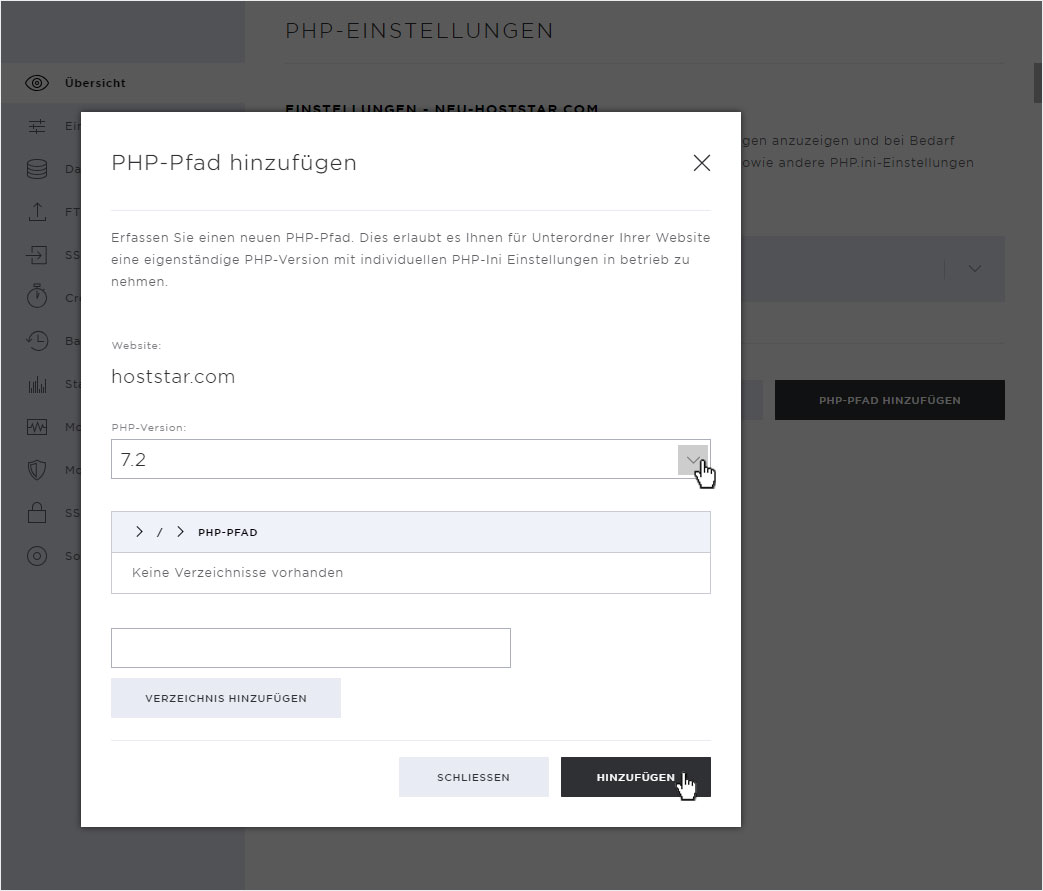
A green Success message indicates that the new path has been successfully added. The new entry with the newly created path was added to the overview.
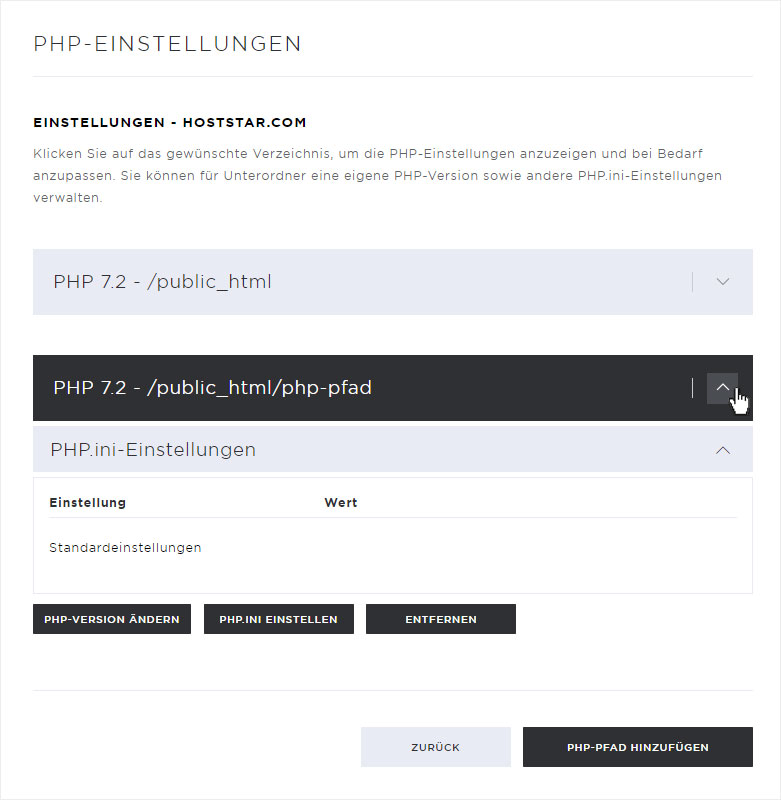
You can now edit this new Path area independently. Click the Drop-down arrow. You can now make the following settings here:
• Change PHP version
• Set up PHP.ini
• Remove PHP path
By clicking on this button, this Path area will be deleted immediately if you confirm the corresponding Warning message.
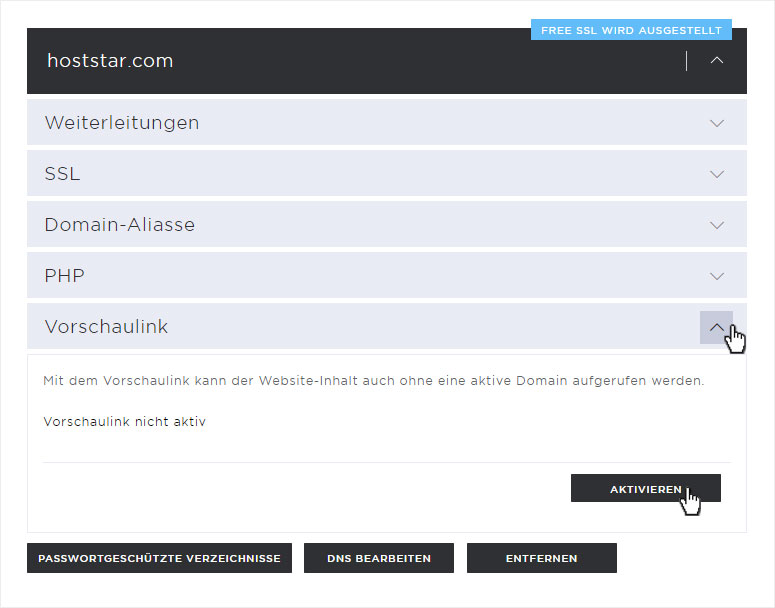
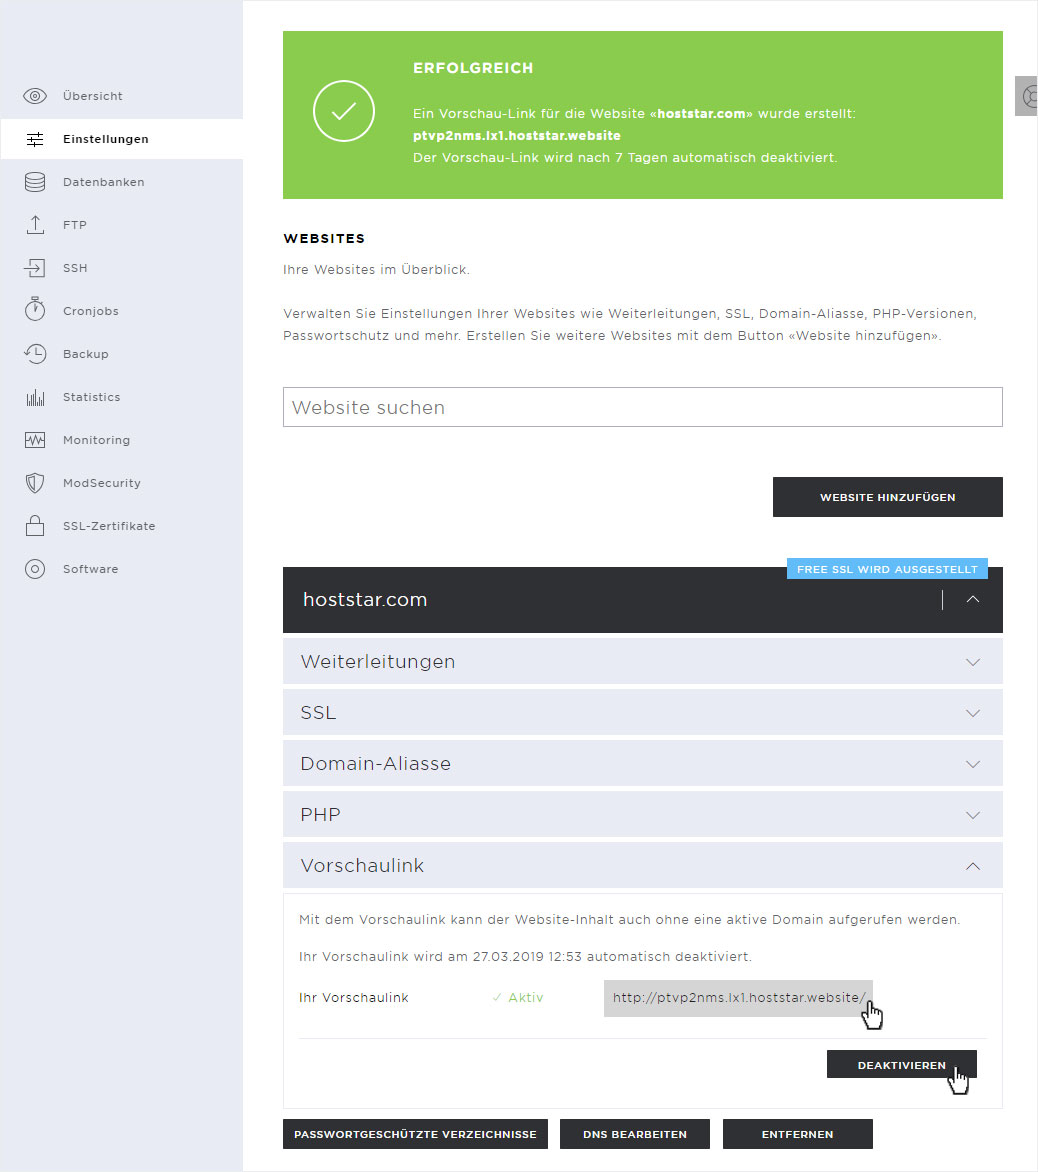
2.5 Preview link
You can activate a preview link for each Web site area in your hosting individually, so that you can call the Web site even if you do not yet have an active domain.
To do this, click on the Activate button in the Preview link area.
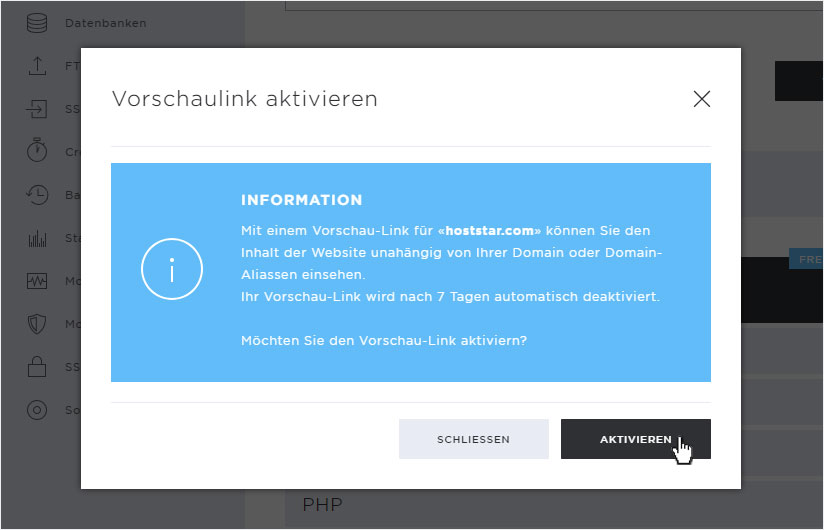
An info popup opens. If you want to activate the preview link, confirm by clicking on the Activate button.
Please note that the preview link is automatically deactivated again after 7 days.
A green Success message indicates that the preview link has been successfully added or activated. Also here it is pointed out again that it will be deactivated automatically in 7 days.
If you open the Preview link area again, the link is marked as active and you can click directly on the displayed link (here e.g.: http://ptvp2nms.lx1.hoststar.website/) and this opens in a new tab.
Here you also have the possibility to deactivate the preview link again.
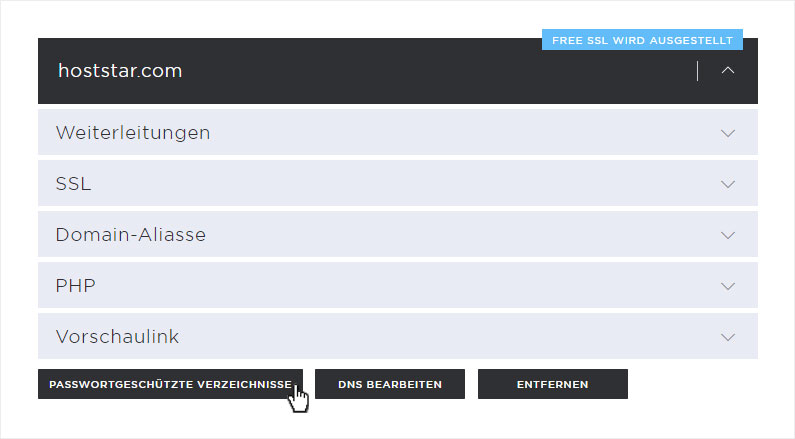
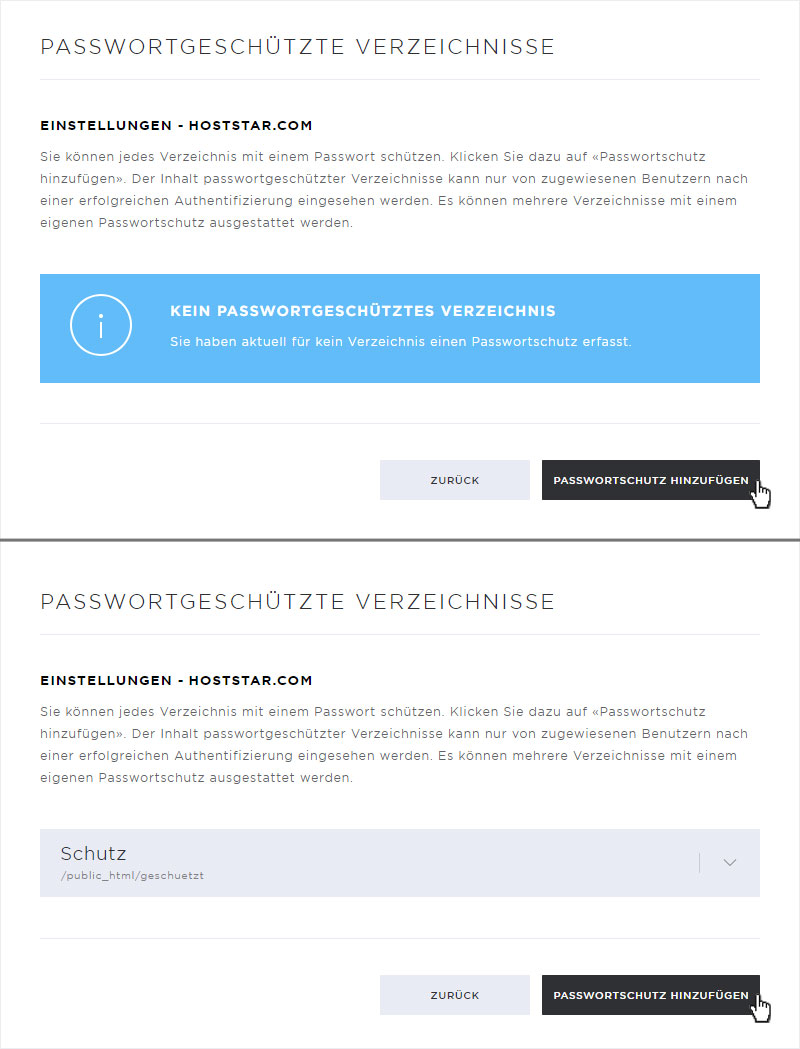
2.6 Password-protected directories
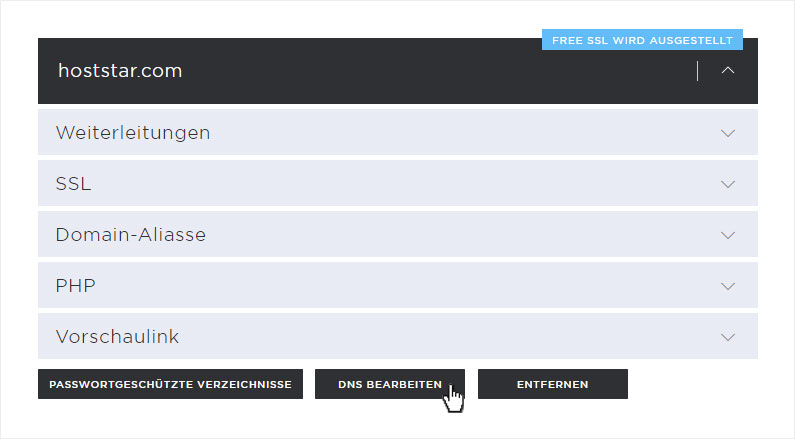
You can protect individual directories with a password at any time. Click on the Password-protected directories button in the corresponding Web site area.
You will automatically be redirected to the Password-protected Directories overview page. Depending on whether you already have protected directories or not, either an information message or the already protected directories will be displayed.
To protect a directory click on Add.
In the pop-up window that opens now, you can either select an existing directory or add a new one. If you want to add a directory, enter the name and click on Add directory. This will be created immediately. Select this directory by clicking on it.
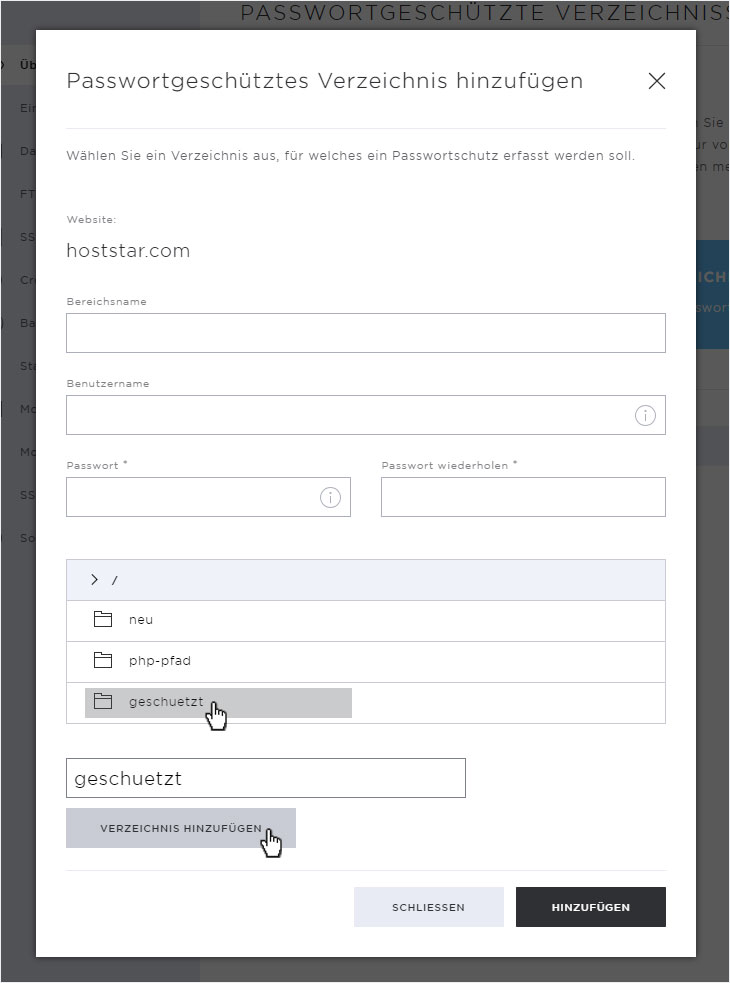
Now enter the required data, such as Area name, User name and Password. Then click on the Add button.
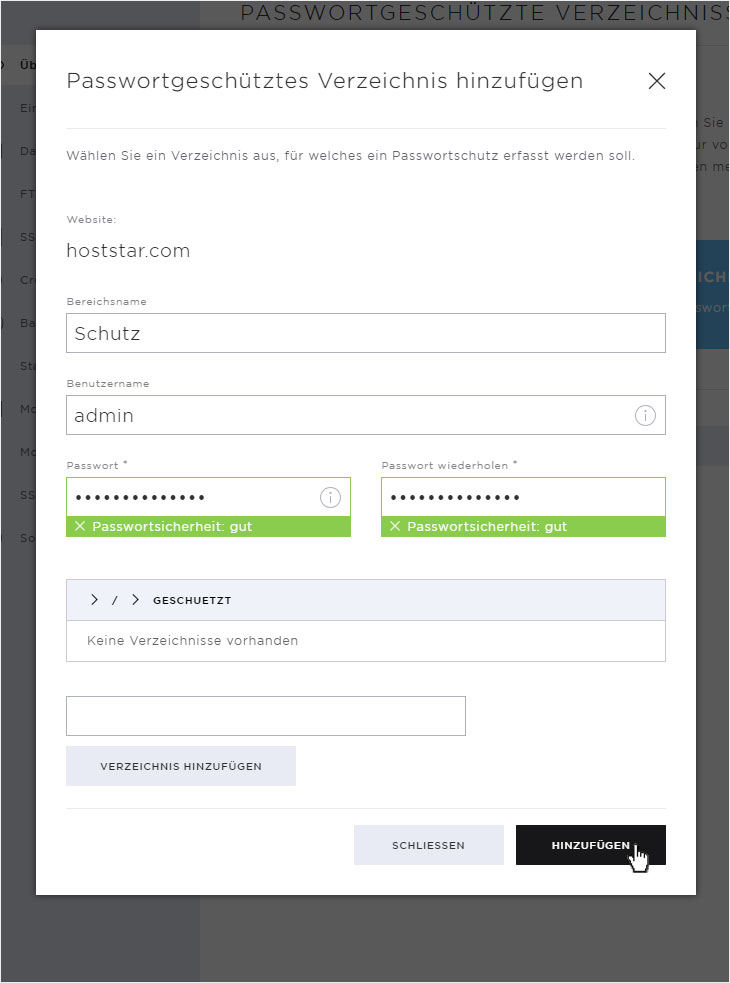
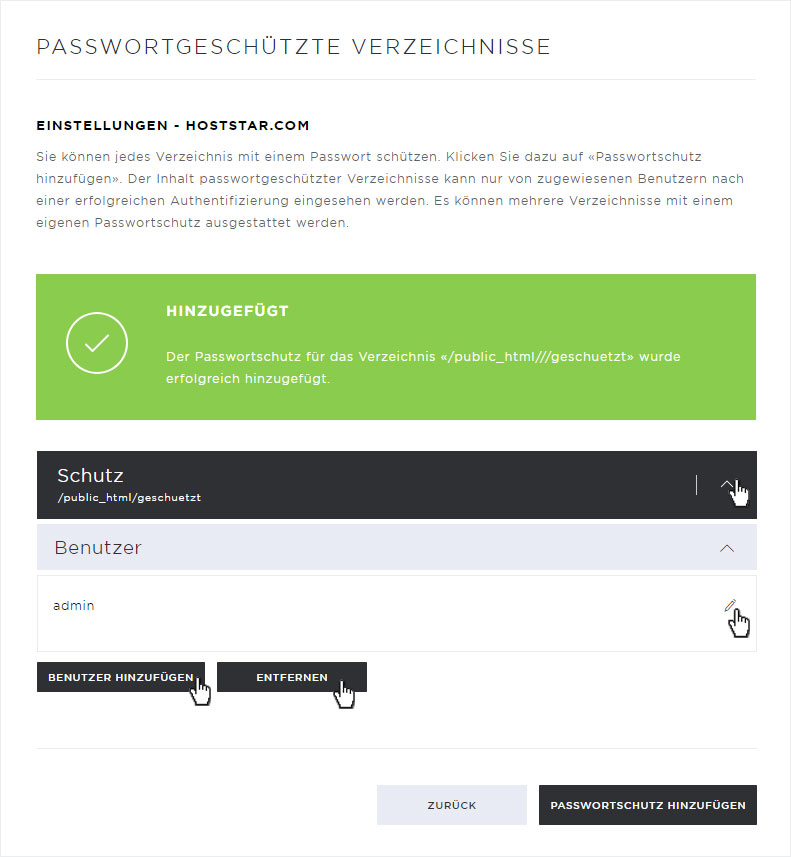
The directory protection is created immediately. This is indicated by the green success message and the corresponding entry.
You can now customize the existing user, add a new user or remove the entire directory protection at any time.
2.7 Edit DNS
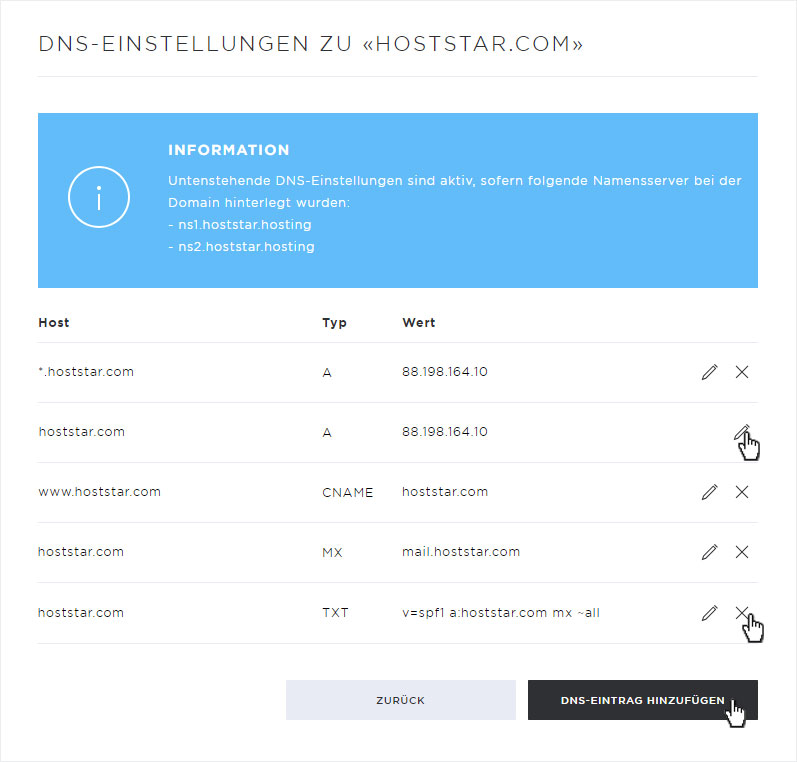
You can edit the existing DNS settings at any time and add more DNS records. To do this, click on the Edit DNS button.
You will be automatically redirected to the DNS settings - overview. The following adjustments are possible here:
• Change DNS record
• Add DNS record
• Remove DNS record - You can remove the DNS records at any time. Click on the X icon next to the corresponding entry. Please note, if you confirm Remove on the now appearing warning message, the entry will be irrevocably deleted.
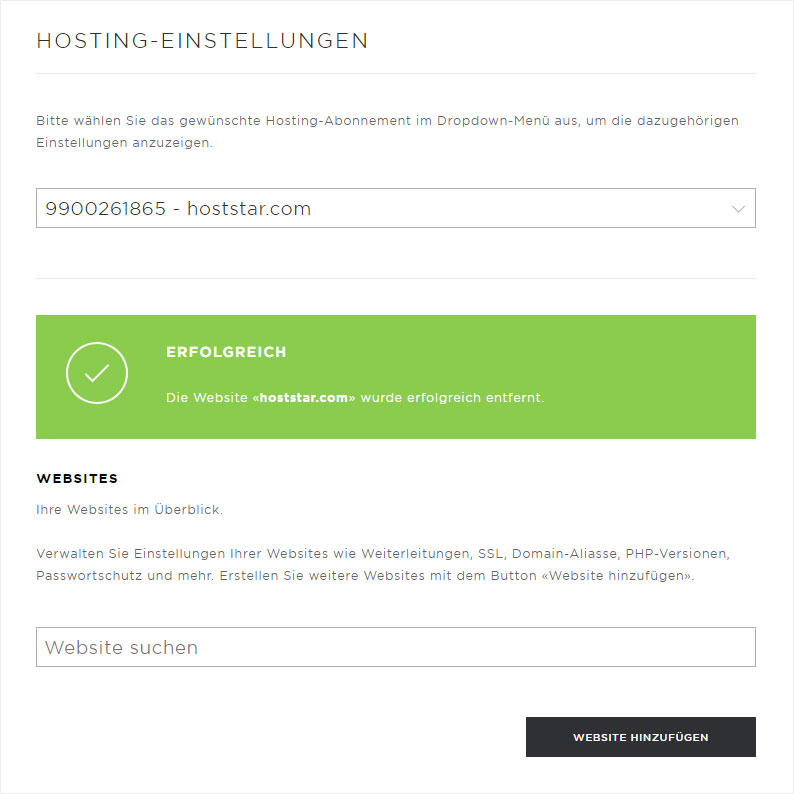
2.8 Remove website
If you want to completely and irrevocably delete a Web site area with all data, click on the Remove button.

A Warning message will be displayed and you will be asked to confirm the deletion of all data.
Please note that if you click on the Remove button again, the website and all associated data will be irrevocably and permanently deleted.
If you are sure that you no longer need this Web site area, click the Remove button again.

Depending on the amount of data, the complete deletion may take some time. Once all data has been removed, a green Success message will appear on the Hosting settings overview.